 Clos
 Closentry
User Guide
From two files to a signed-off reconciliation: importing, matching, reviewing, all bank accounts at once, the reconciliation statement, reports, team approvals, the month-end close and account reconciliation.
Contents
- 1The screen at a glance
- 2Step 1 - Import data
- 3Step 2 - Map columns
- 4Step 3 - Reconcile
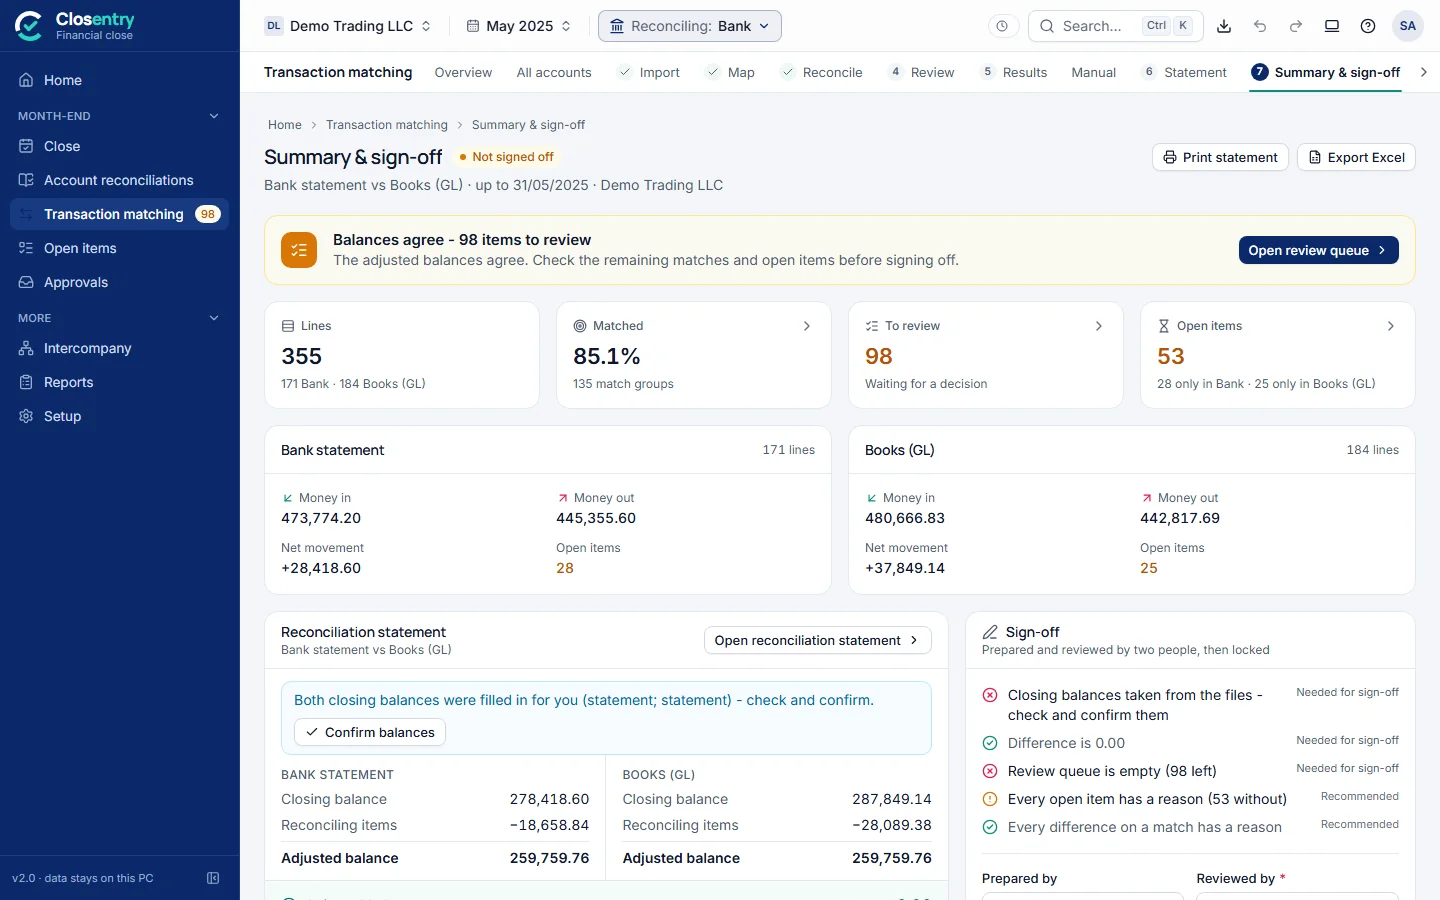
- 5Step 4 - Summary & sign-off
- 6All bank accounts at once
- 7Review queue
- 8Match results and the match drawer
- 9Manual match and exceptions
- 10Reconciliation statement and outstanding items
- 11Export & print
- 12Custom report in your own format
- 13Workpapers and approvals
- 14Month-end close and account reconciliation
- 15Intercompany group
- 16History, auto-tag rules and audit trail
- 17Settings
- 18Keyboard shortcuts
- 19What each match type means
1. The screen at a glance
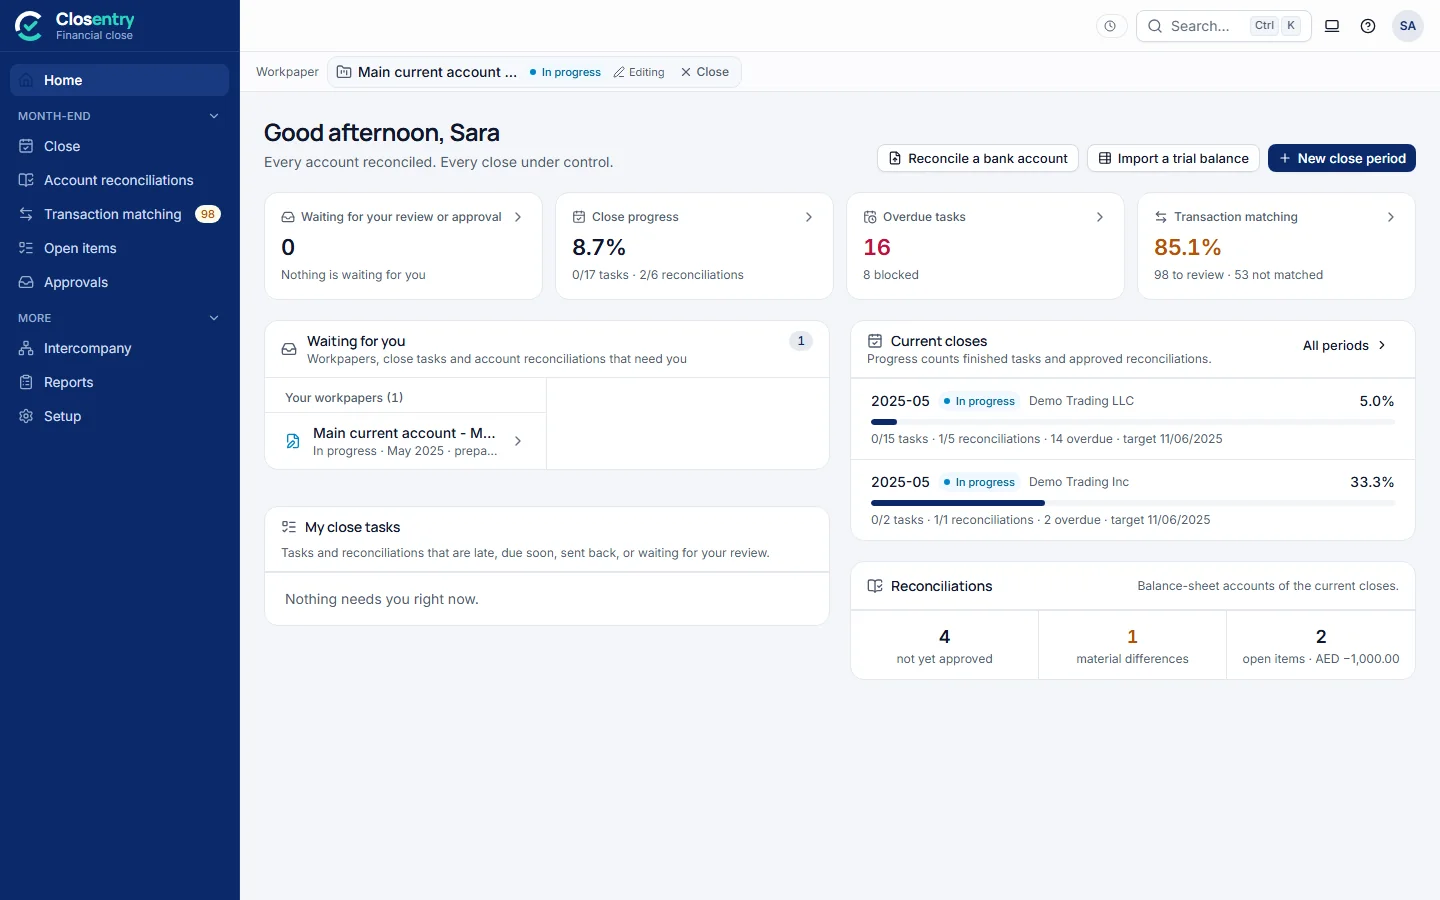
- Side menu: Home; Month-end – Close, Account reconciliations, Transaction matching, Open items, Approvals; More – Intercompany, Reports, Setup. Numbers beside an item show what is still open, for example 98 to review or 1 waiting for your approval. The arrow at the bottom collapses the menu.
- Tabs under the top bar: the screens of the section you are in. Transaction matching shows Overview, All accounts (every bank account of the month, section 6) and its numbered steps: Import › Map › Reconcile › Review › Results › Statement › Sign-off; a finished step gets a tick. On a small window the tabs scroll, with arrows at the ends, and the side menu shows icons only.
- Top bar: trial or licence status; Search (Ctrl+K) to find an account, reconciliation, close period, task, open item or transaction, or to jump to any screen or action; light / dark theme; Help (?: Getting started, the User guide, the Setup guide, the tutorial videos and Open log folder for support); your initials. On the bank matching screens it also shows the company, reconciliation type and period (click any of them to change it), Export, and Undo / Redo.
- Workpaper bar (team only): which workpaper is open, its status, whether you are editing it, and Close.
- Home shows what is waiting for your review or approval, your close tasks, the current closes and the bank matching. Every card opens the screen behind it. In a new workspace it starts with Set up your month-end close: add your company, create the close period, import the trial balance (section 14).
- Transaction matching › Overview is the dashboard of the bank reconciliation: match rate, to review, not matched, difference, open over 30 days, cash to look at, sign-off and brought forward.
2. Step 1 - Import data
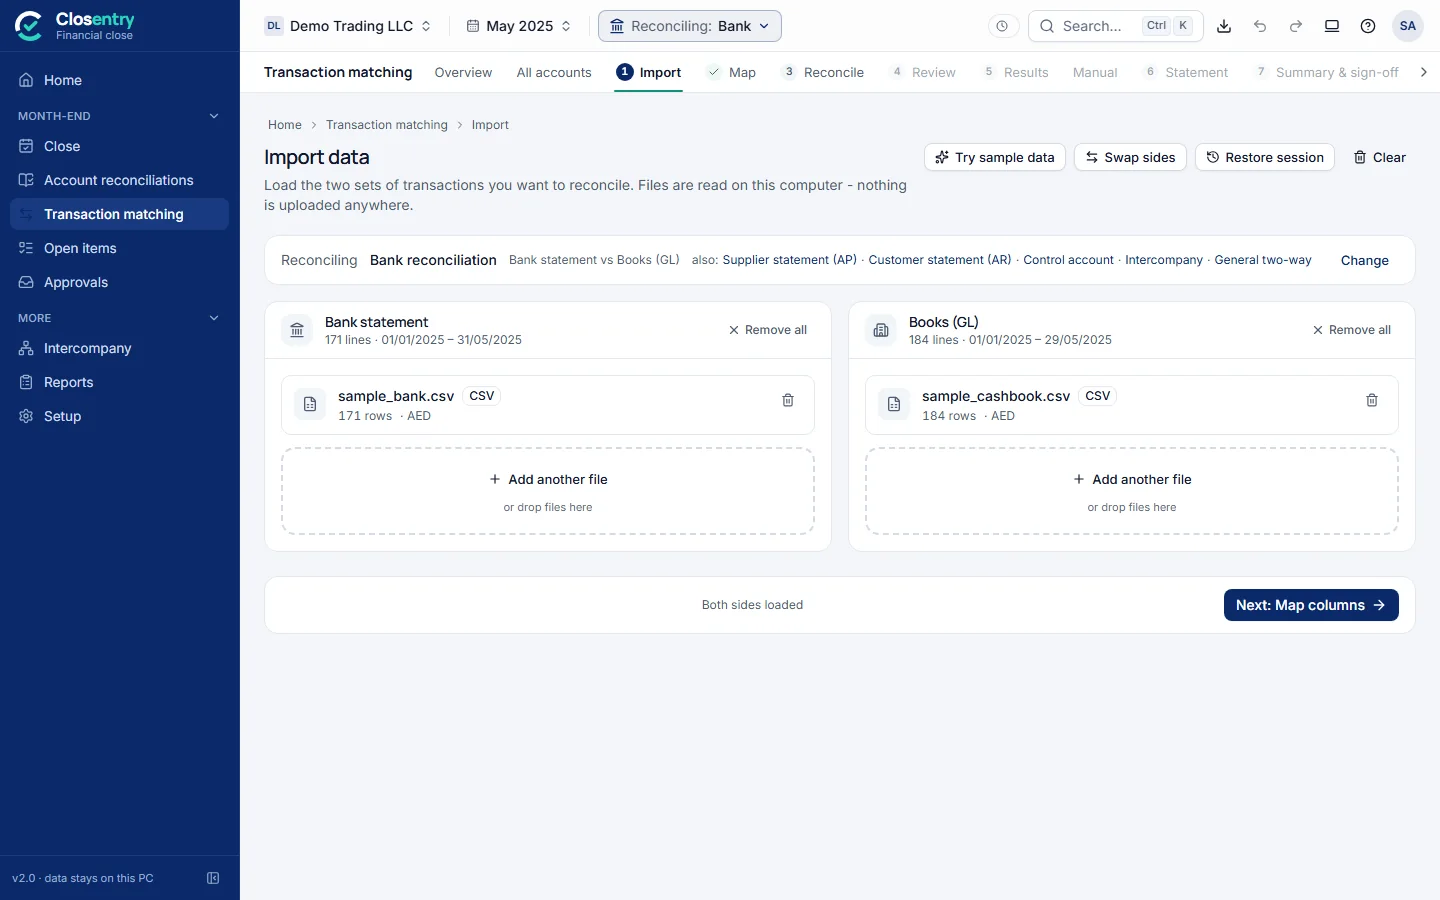
- Choose what you are reconciling, for example Bank reconciliation.
- Drop the bank statement on the left box and the cash book / GL on the right, or click Choose file.
- Check what was read: number of lines, date range, the sheet used and the header row. If the header was guessed wrong, set Header is on row N. If a workbook has several sheets, pick the right one.
- Several files for one side (all bank accounts against one ledger, for example): use + Add another file.
- Click Next: Map columns.
Accepted files: Excel (.xlsx, .xlsm, .xls), CSV/TXT, PDF from accounting systems and banks, OFX, QIF, MT940, CAMT.053, BAI2. Scanned PDFs and photos are read with Windows OCR and marked READ BY OCR - CHECK AMOUNTS. Totals, opening/closing balance lines, letterheads and footers are left out automatically.
3. Step 2 - Map columns
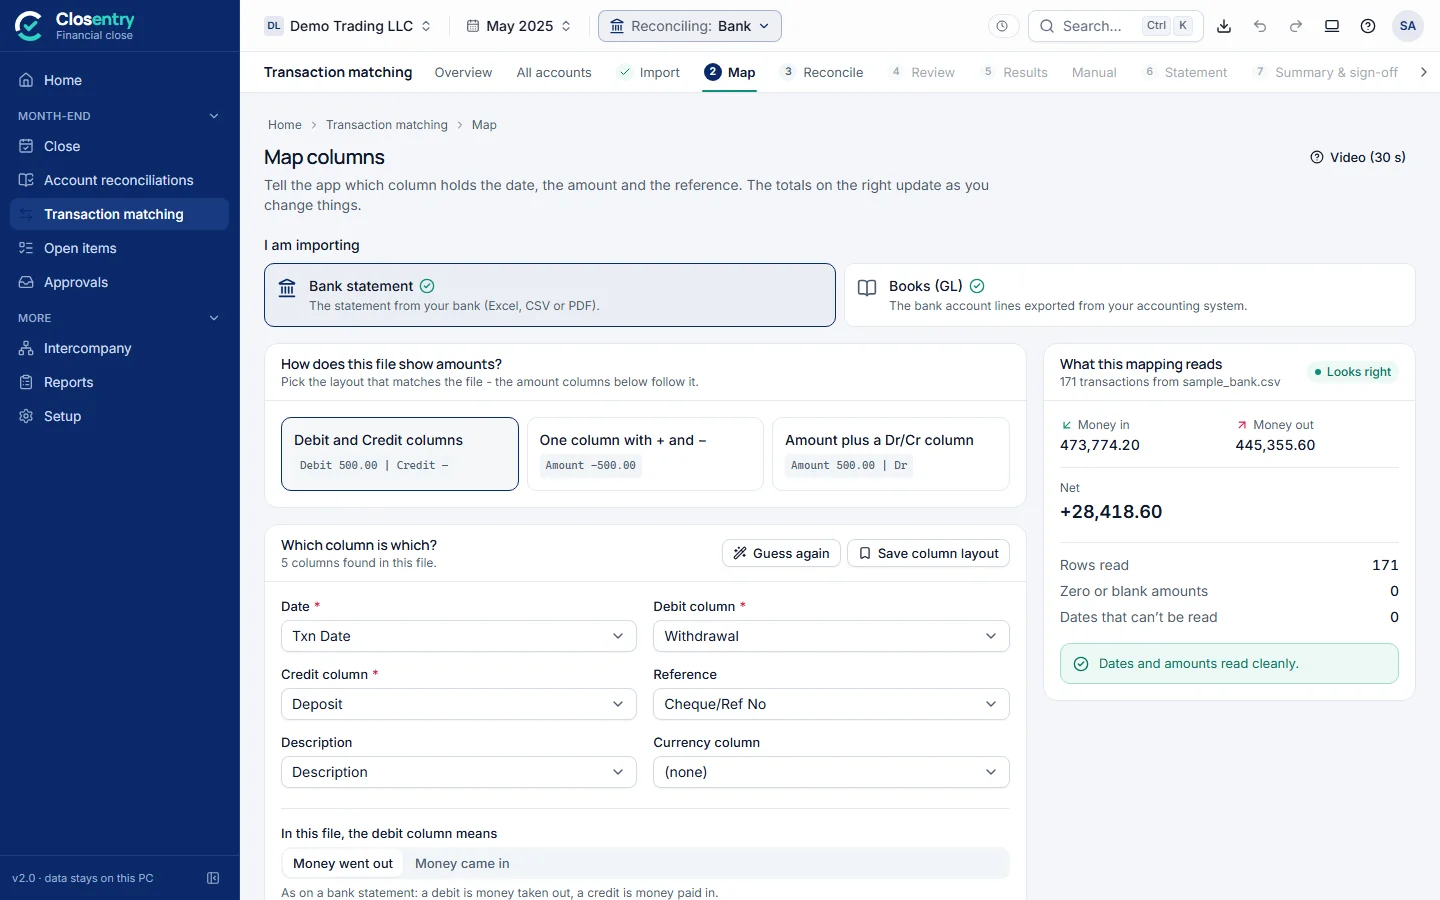
- Under I am importing, choose the file to check: the bank statement or the books (GL). Then answer How does this file show amounts?
- Debit and Credit columns
- One column with + and −
- Amount plus a Dr/Cr column
- Check the guessed columns: Date, Debit / Credit (or Amount), Reference, Description, and Currency if there is one.
- In this file, the debit column means is set for each side already: Money went out for a bank statement, Money came in for the books. Change it only if the totals on the right come out the wrong way round.
- Advanced options (closed unless needed) hold the number and date format, file currency, running balance, header row and row filter. They open by themselves when something is set or a date can't be read.
- Watch the box on the right. Money in, money out and net should agree with the file's own totals, and Dates and amounts read cleanly should be green.
- Save as template stores the mapping. Next time a file with the same columns arrives, it is applied automatically.
4. Step 3 - Reconcile
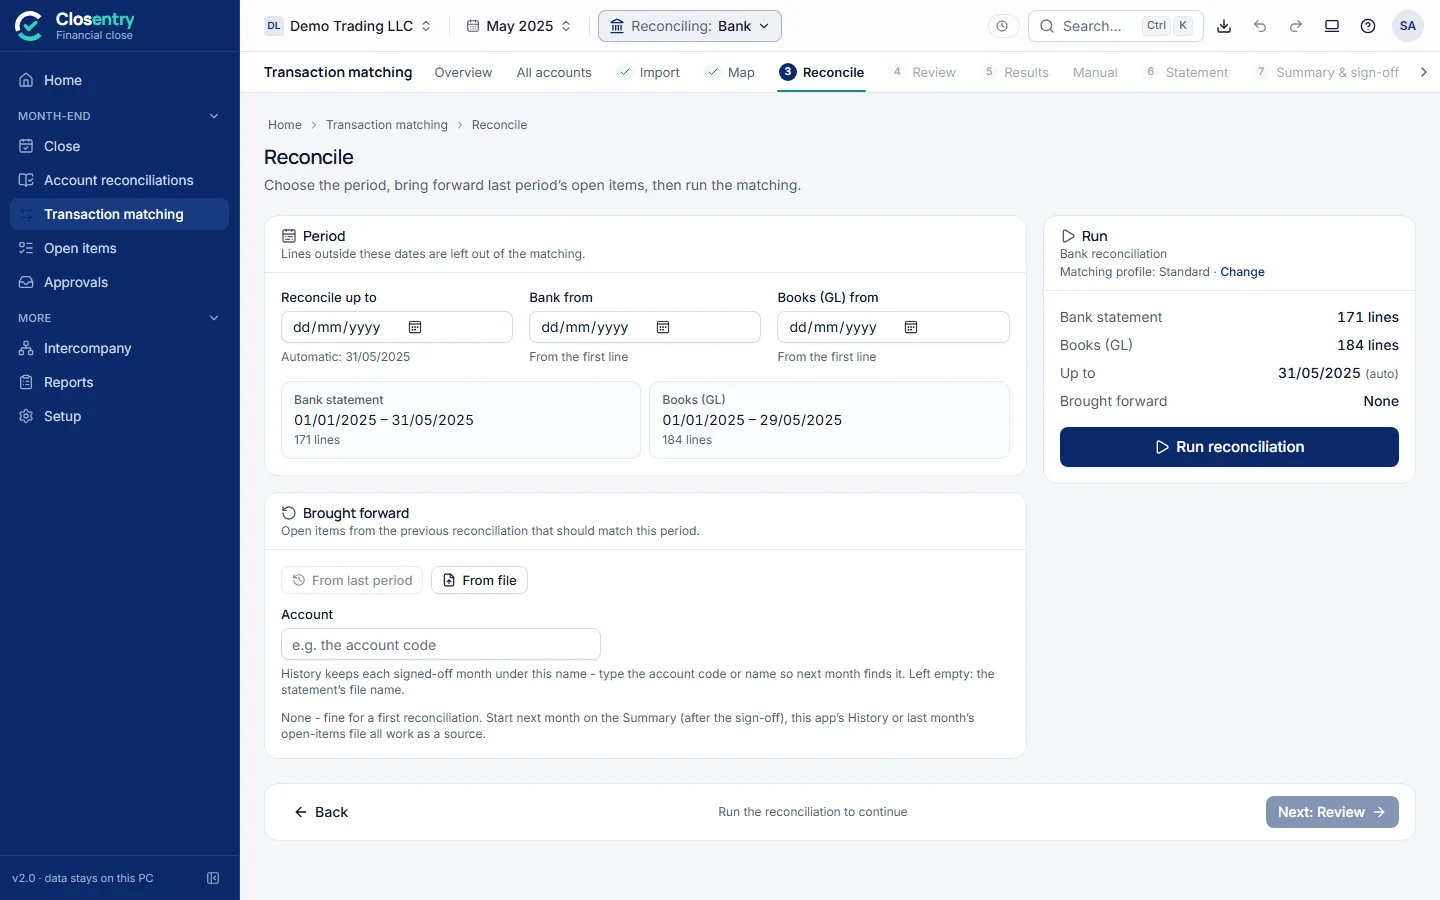
- Reconcile up to is the period end. It is filled from the files and can be changed. Bank from and Books from leave out older lines if needed.
- Brought forward adds last period's open items. From last period uses the open items saved in History for the same account. From file reads the app's own Open items export or your existing reconciliation sheet. Brought-forward items can be cleared by any later line and are marked (b/f) if still open.
- Matching profile: Standard suits most work. Use Change to choose a stricter or looser profile, or your own rules.
- Click Run reconciliation. A progress bar shows the passes. When it finishes, the Review step opens if items wait for a decision, otherwise Sign-off. Running again later keeps your earlier decisions (accepted matches, reasons, notes) for lines that are still there.
5. Step 4 - Summary & sign-off
The banner tells you where you stand:
- AED x unexplained: the adjusted balances don't agree yet.
- Balances agree - N items to review: the figures tie, but some matches or open items still need a person.
- Reconciled and reviewed - ready to sign off
- Signed off by …: the reconciliation is locked.
Sign off
- Confirm balances. The closing balances are taken from the files. Check them against the statement and the trial balance, then confirm or type the correct figure.
- Work through the checklist: difference 0.00, review queue empty, and a reason for every open item (recommended).
- Enter Prepared by and Reviewed by (you are warned if they are the same person), add a note, and click Sign off & lock. If points are still open, you are asked why, and the answer is recorded.
A signed-off reconciliation can't be changed. Unlock asks for a reason, and both the lock and the unlock appear in the audit trail. In a team, sign-off happens through workpaper approval instead (section 13). Many bank accounts at once: section 6.
6. All bank accounts at once
Transaction matching › All accounts reconciles every bank account of the month in one go: import all the statements together, run them together, and sign off each account on its own. Each account keeps its own reconciliation, result and sign-off.
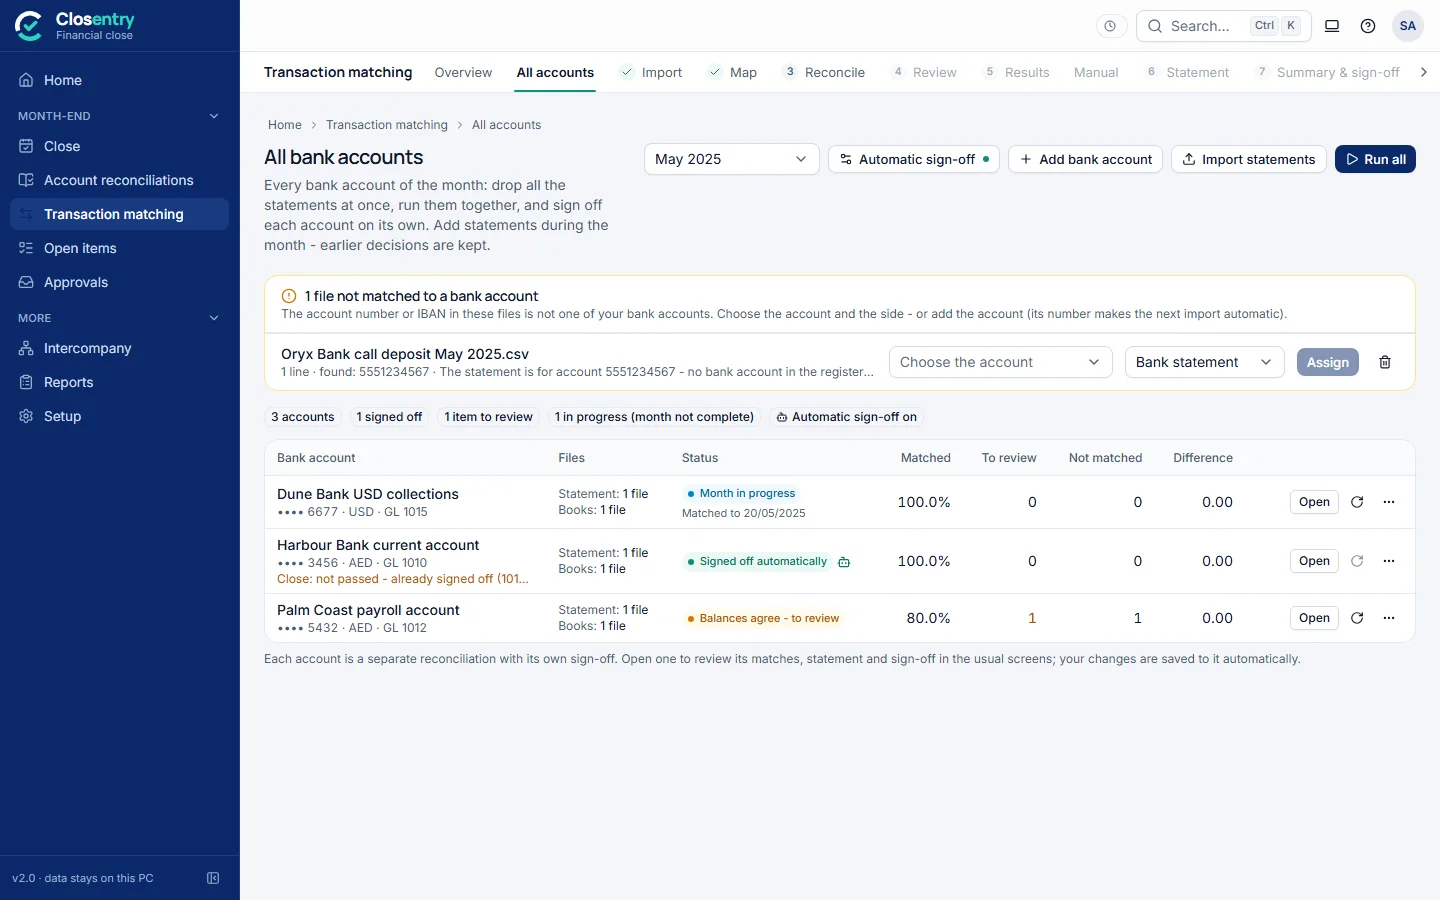
Once: the bank accounts
Add bank account: its name, account number or IBAN, currency, the bank's GL account in your ledger, and the company. The number lets the app recognise the account's statements. The GL account picks the account's lines out of a combined ledger and links it to its reconciliation in the close (section 14). In a team, an admin keeps this list.
Every month
- Choose the month and click Import statements. Drop all the bank statements and the ledger at once. Each statement goes to its account by the account number or IBAN in the file. A ledger holding several bank GL accounts is split by account code.
- A file that can't be placed (an unknown account number, for example) waits at the top of the page. Choose the account and the side and click Assign, or discard it. Add the account with its number and the next import is automatic.
- Run all reconciles every account with the same matching as a single reconciliation. The run carries on if you leave the page. Decisions made earlier (accepted matches, reasons, notes) are kept.
- Each account shows its status: Signed off automatically, Balances agree, Balances agree - to review, Difference to explain, Month in progress or Files changed - run again, with the match rate, items to review, items not matched and the difference. Point at a status to see why an account was not signed off automatically.
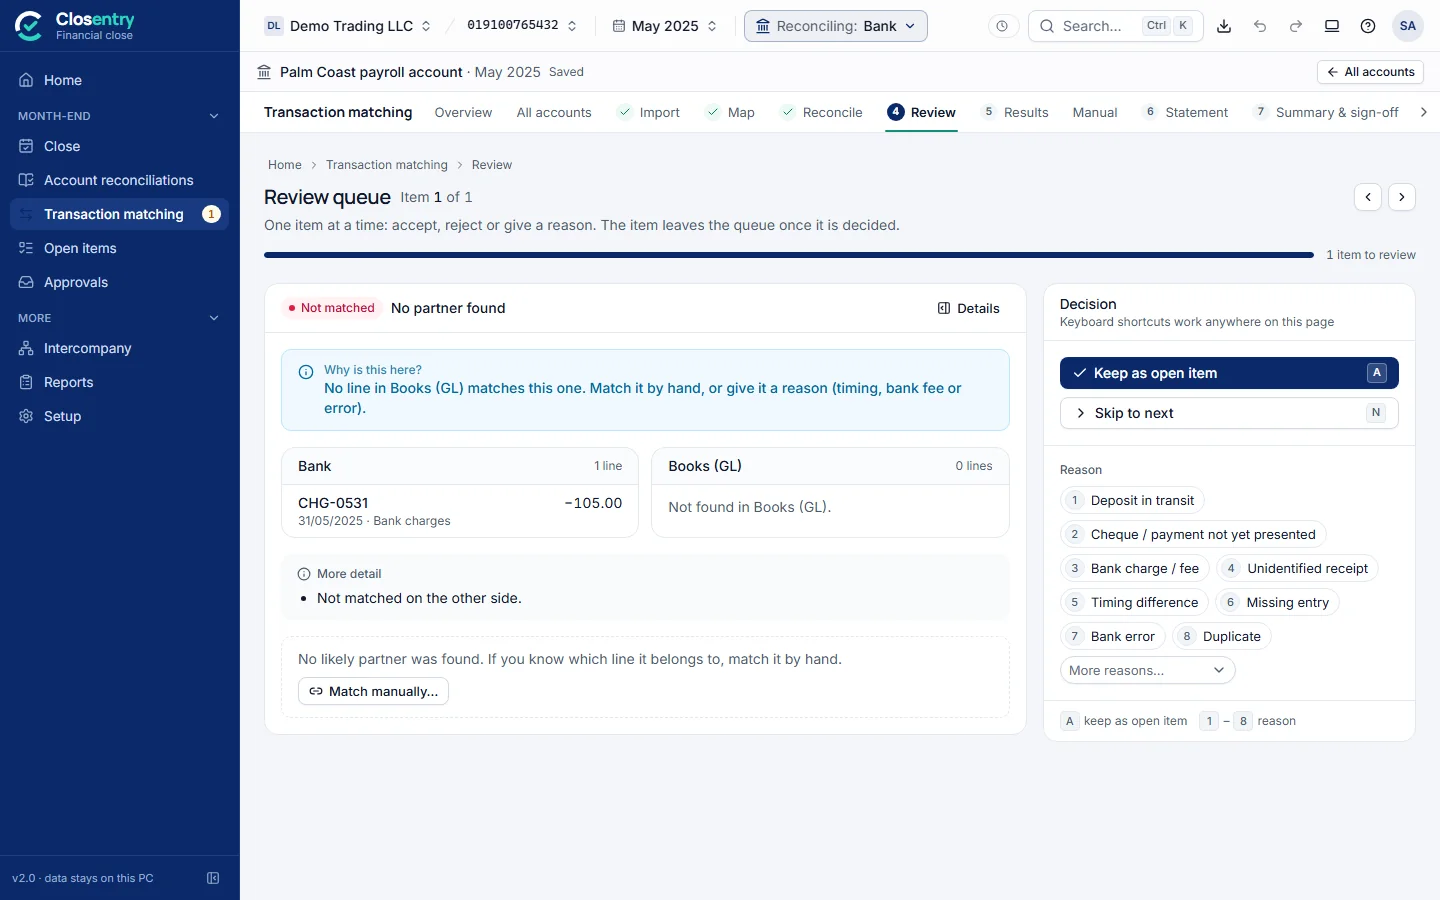
- Open an account to work on it in the usual screens: Review, Results, Statement and Sign-off. The bar above them names the account and month, and your changes are saved to it as you go. All accounts takes you back.
Matching during the month
Import statements as they arrive, for example every week. A new file is added to the account's month. Lines already loaded are skipped as duplicates, so a statement that repeats earlier days is safe to import. Until the statement reaches the month end, the account shows Month in progress with the date it is matched to, and it is never signed off. At the month end, import the rest and run again: the decisions already made stay.
Automatic sign-off (optional)
Off until you switch it on with Automatic sign-off (an admin in a team). After a run, an account is signed off automatically only when all of these hold:
- the statement reaches the month end and nothing changed since the run;
- both closing balances are known, and the difference is 0.00;
- nothing waits in the review queue;
- no open item is older than the number of days you set (30 by default), and every open item has a reason (unless you switch that off).
The sign-off is made by Closentry (automatic) and names the rule. It appears in the list, on the Sign-off page and in the audit trail, and it locks the account like any sign-off. Every other account is signed off by a person on the Sign-off page as usual.
7. Review queue
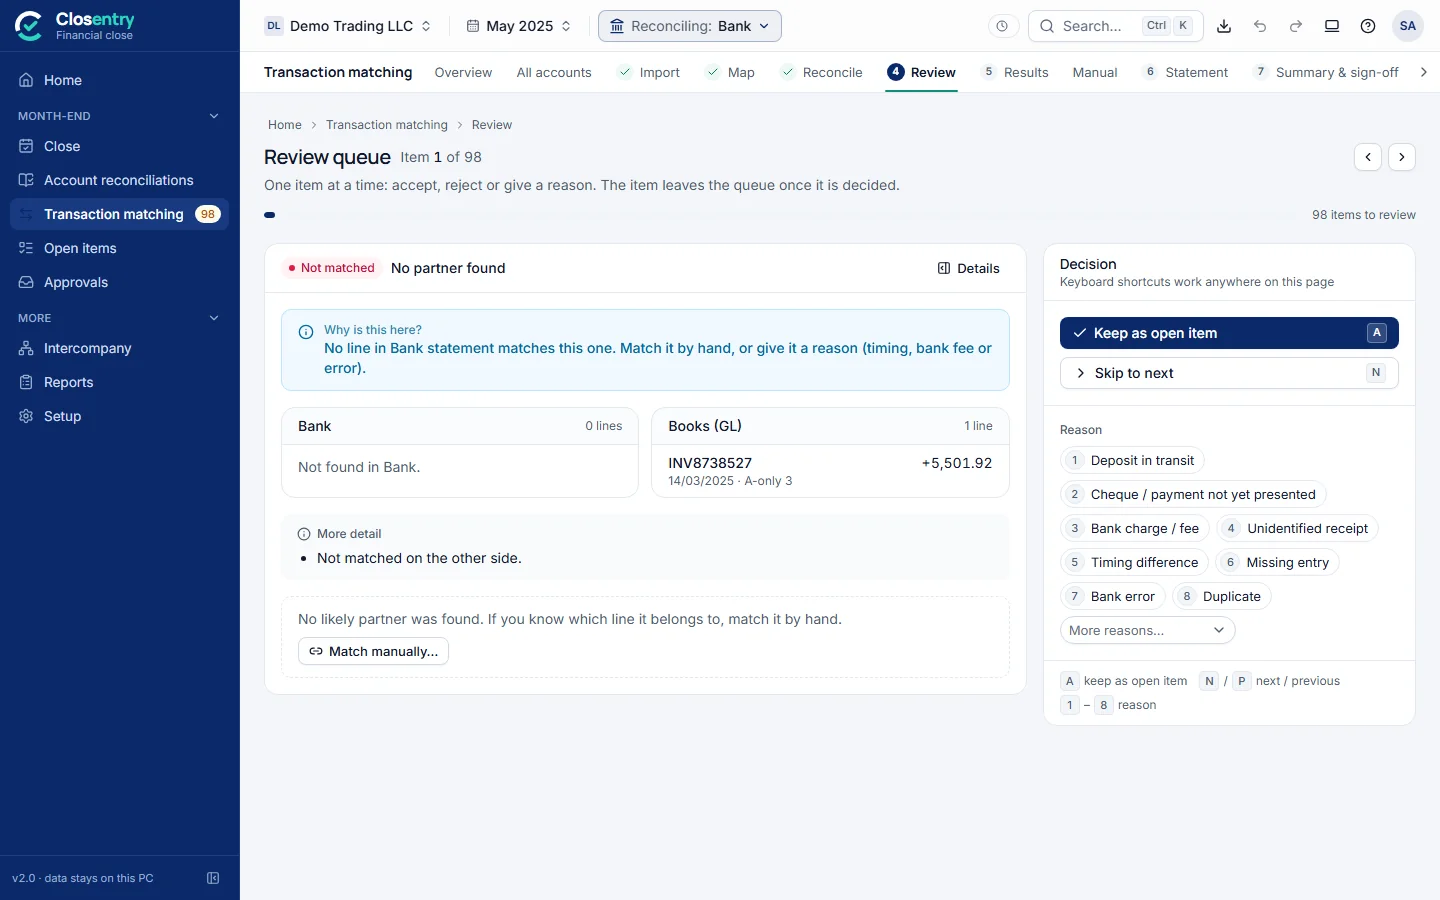
The queue holds everything that needs a person: matches by amount only, combined or split matches, tolerance matches, ambiguous pairings, anything below 90% confidence, and open items. Each item starts with Why is this here?, one plain sentence such as This matched on amount and date only (no reference to compare). Please confirm., then both sides, more detail and the best candidate partner if there is one.
| Key | Action |
|---|---|
| A | Accept the match or suggestion. For an item with no partner, keep it as an open item. |
| R | Reject the suggestion, or unmatch |
| N / P | Next / previous item (the arrow keys work too) |
| 1-8 | Reason: 1 Timing difference, 2 Bank error, 3 Missing entry, 4 Duplicate, 5 Bank charge / fee, 6 FX difference, 7 To investigate, 8 Other |
An item leaves the queue once it is decided. Match manually… opens Manual match with the item already selected. Every decision is written to the audit trail with your name.
8. Match results and the match drawer
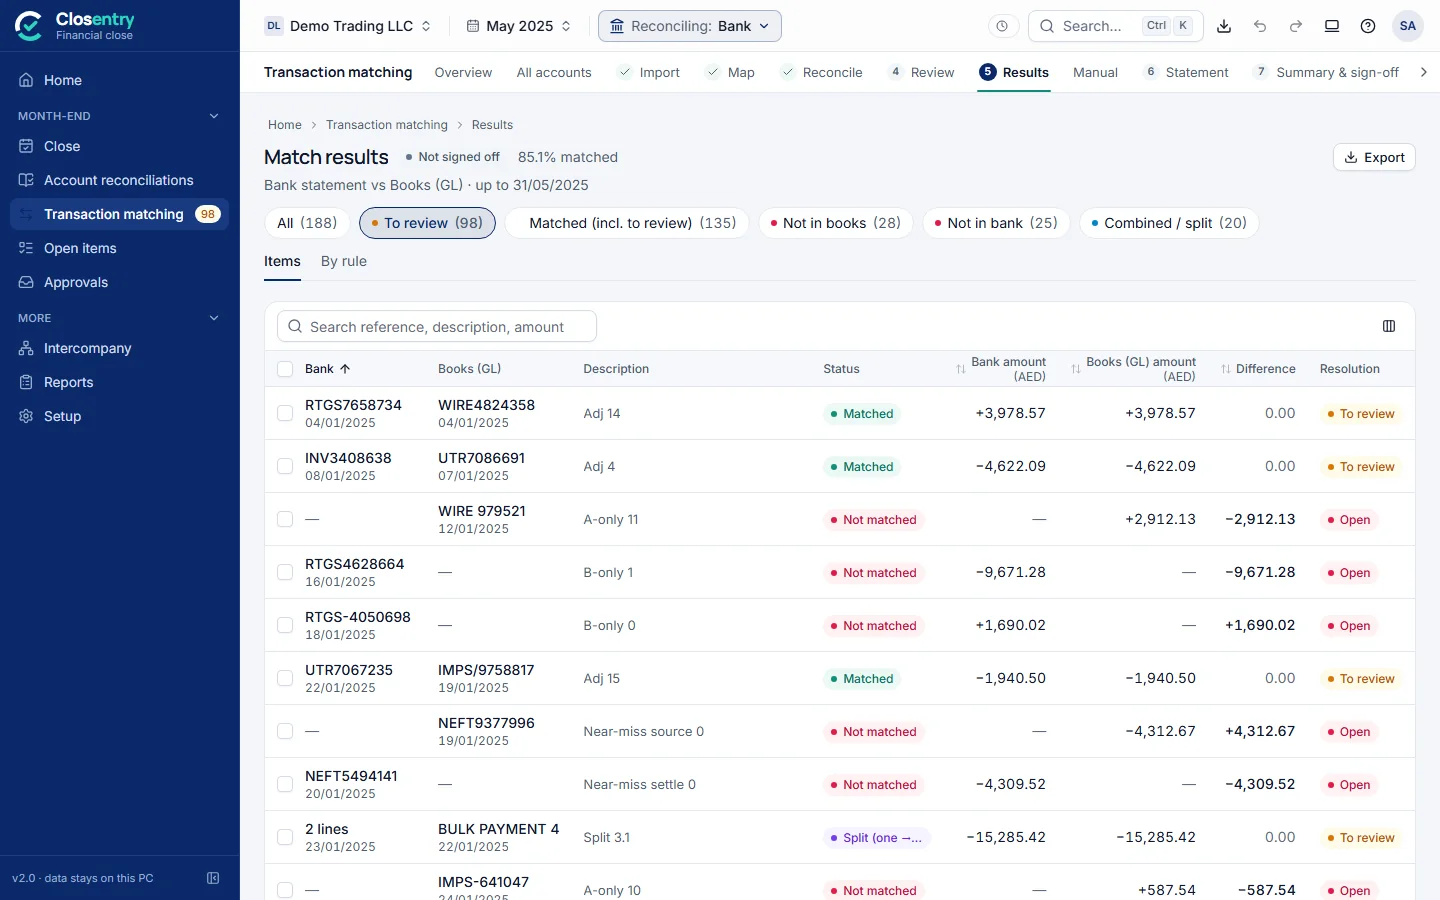
- Filter with the chips: All, To review, Matched, Not in books, Not in bank, and so on. By rule groups the results by how they were found.
- Search by reference, description or amount. Sort by clicking a column heading.
- Tick several rows to accept, give a reason, add a note, tag or unmatch them together.
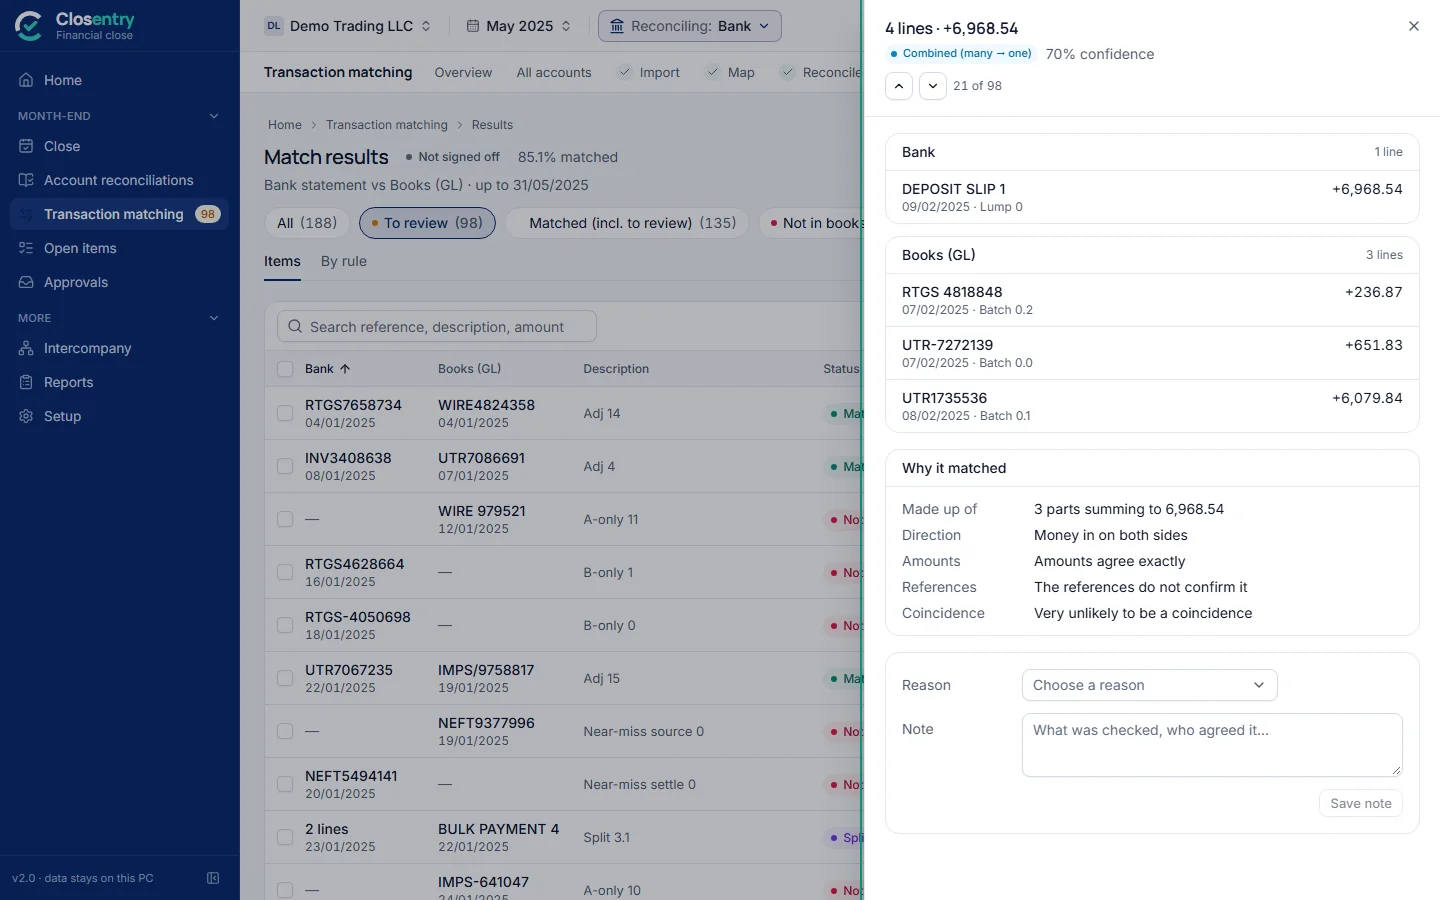
Click a row to open its drawer. It explains the match in plain words (direction, amounts, references, how likely a coincidence is) and lets you accept it, unmatch it, or record a reason and a note. Use the arrows at the top to step through the list. Esc closes the drawer.
9. Manual match and exceptions
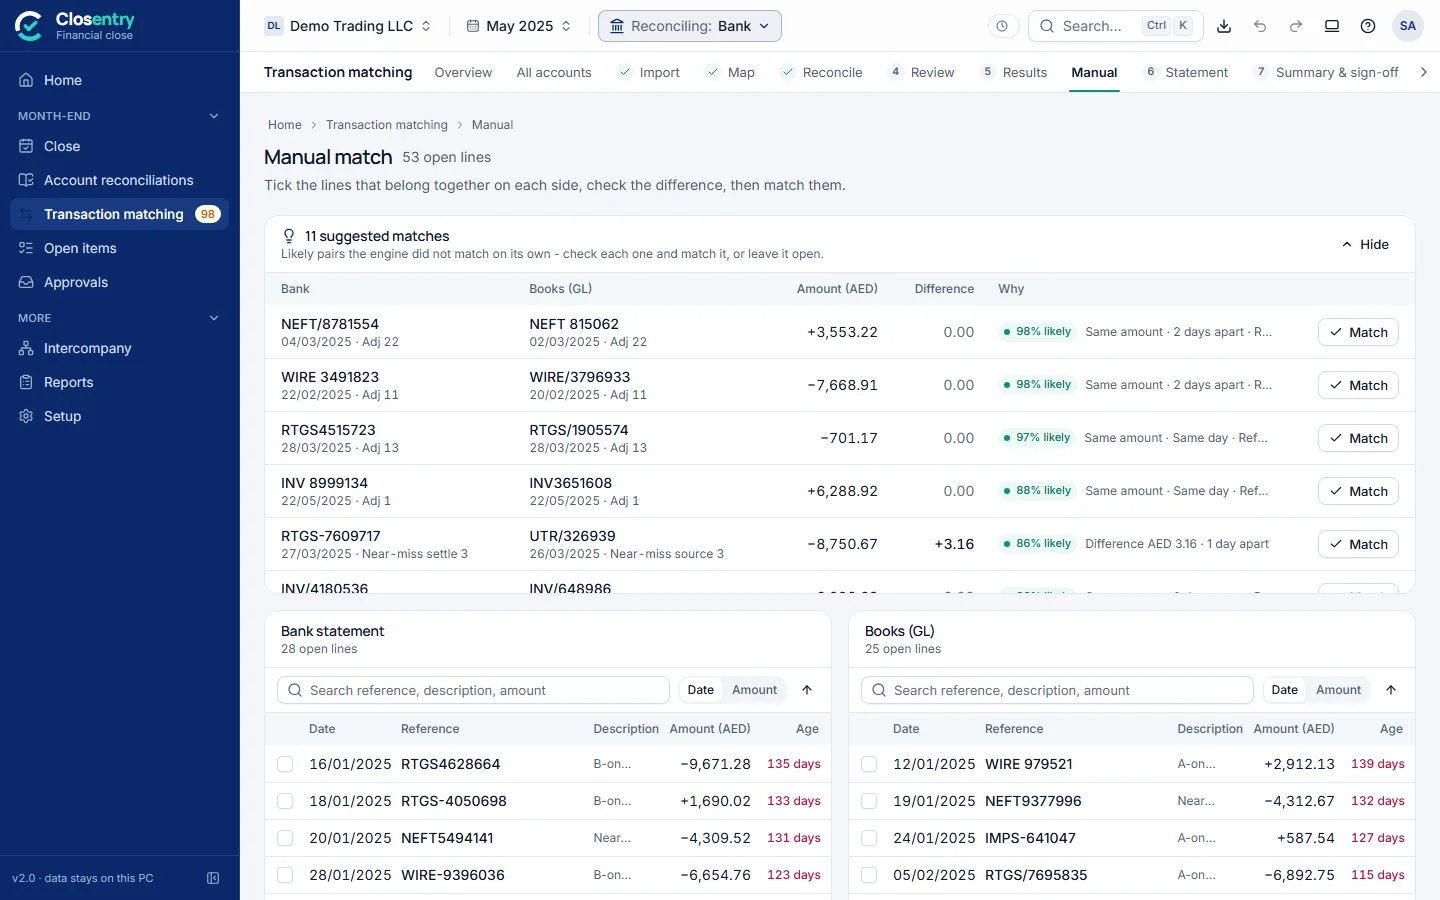
Manual match starts with suggested matches: likely pairs the engine did not match on its own, each with how likely it is and why. Click Match on a suggestion to accept it. Below are the open lines of both sides, which you can search and sort. Tick one or more lines on each side. When the difference is 0.00 (or within your tolerance, which needs a reason), click Match. You can choose a reason and add a note, and both are recorded.
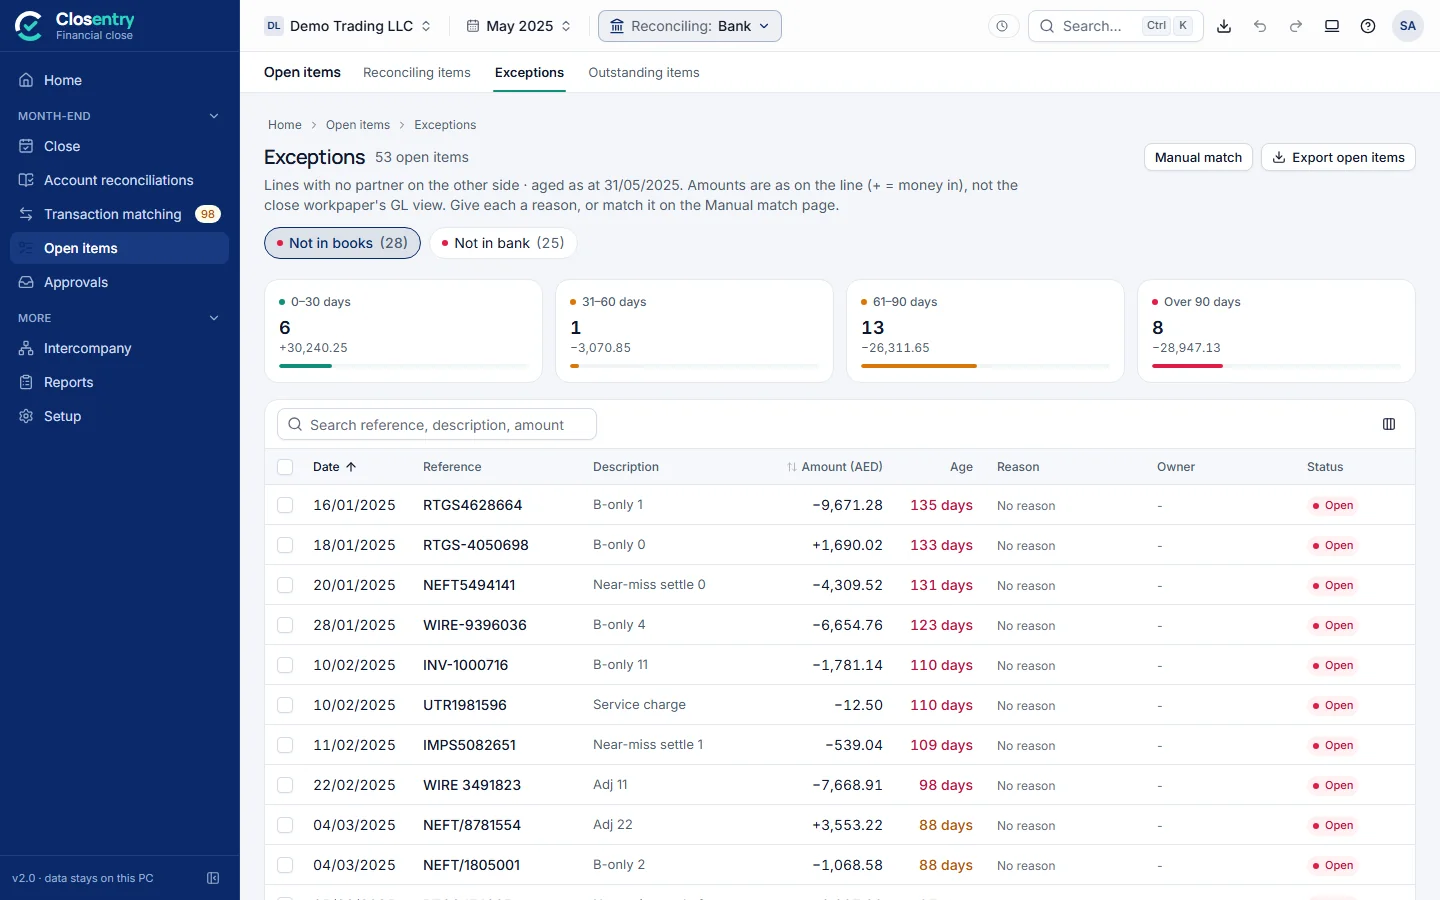
Exceptions lists every line still unmatched. Give each one a reason (timing, bank error, missing entry…) and a note, or match it from here. Lines with a reason move to the right section of the reconciliation statement.
10. Reconciliation statement and outstanding items
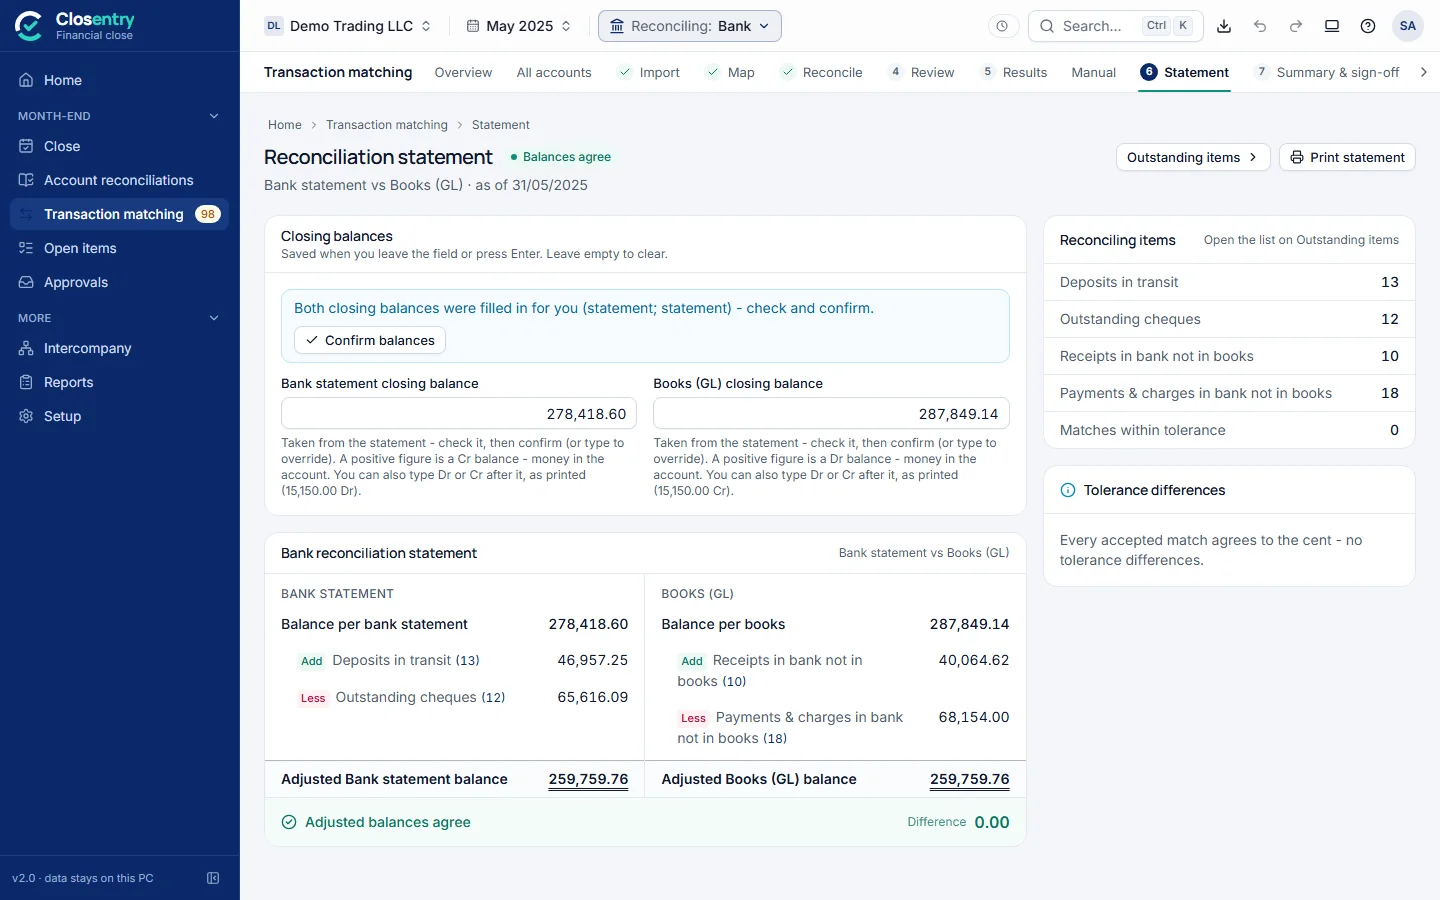
- Closing balances come from the files (OFX, MT940, CAMT, BAI2, or the last balance in a CSV/Excel). Confirm them, or type the figure from the statement.
- The statement adds and subtracts deposits in transit, outstanding cheques, receipts and payments & charges in the bank not yet in the books, and differences on tolerance matches. It shows Adjusted balances agree only when the difference is exactly 0.00.
- Print statement opens a one-page statement with Prepared by / Reviewed by lines, ready to print or save as PDF.
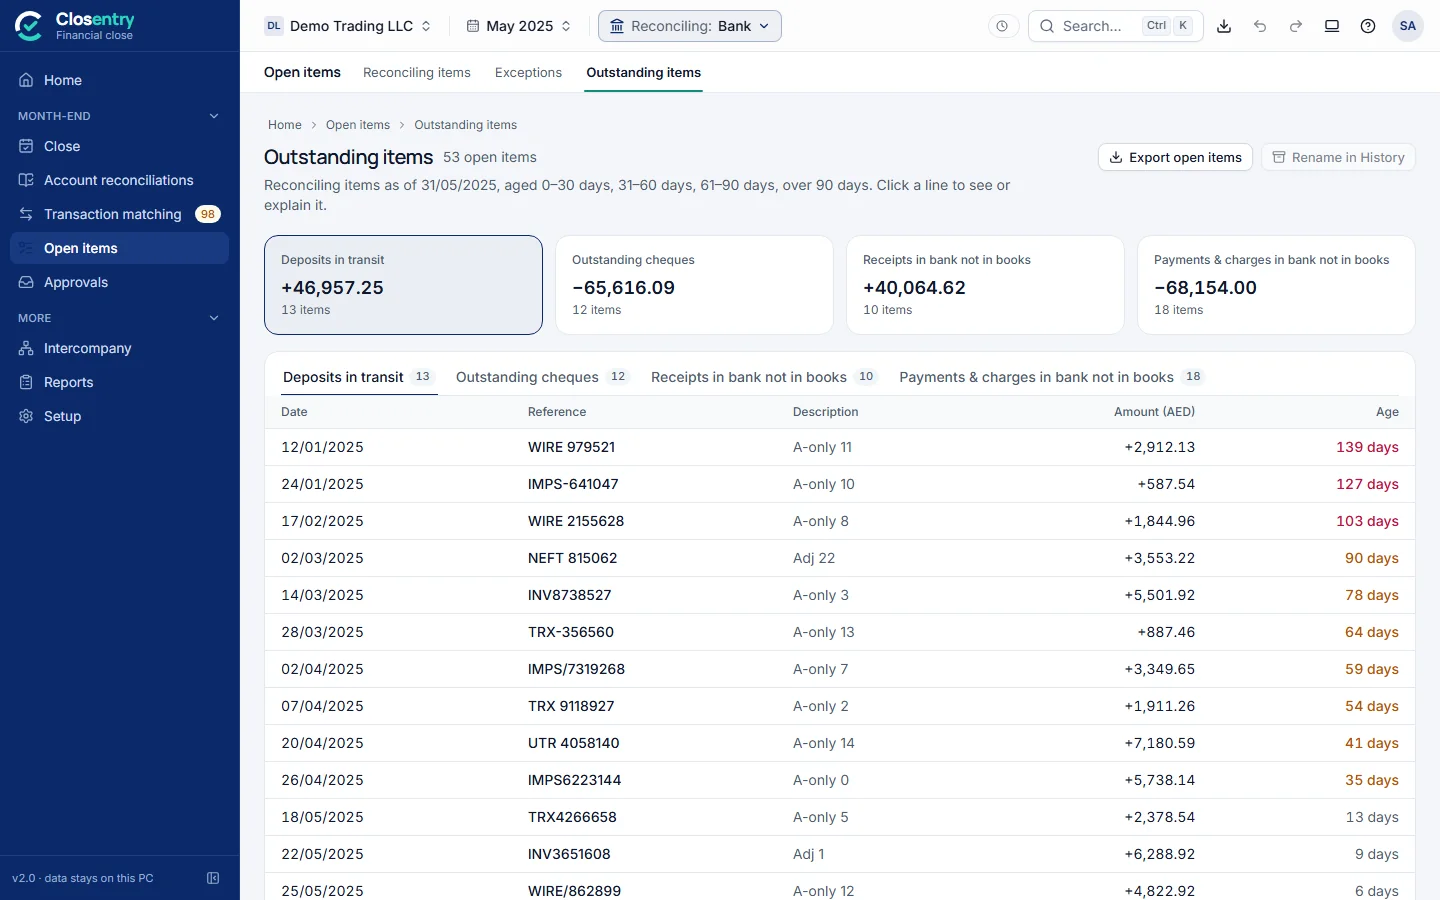
Outstanding items lists the reconciling items by category and age (from the statement date, not today). Export open items saves them for next period's Brought forward.
11. Export & print
| Output | Use |
|---|---|
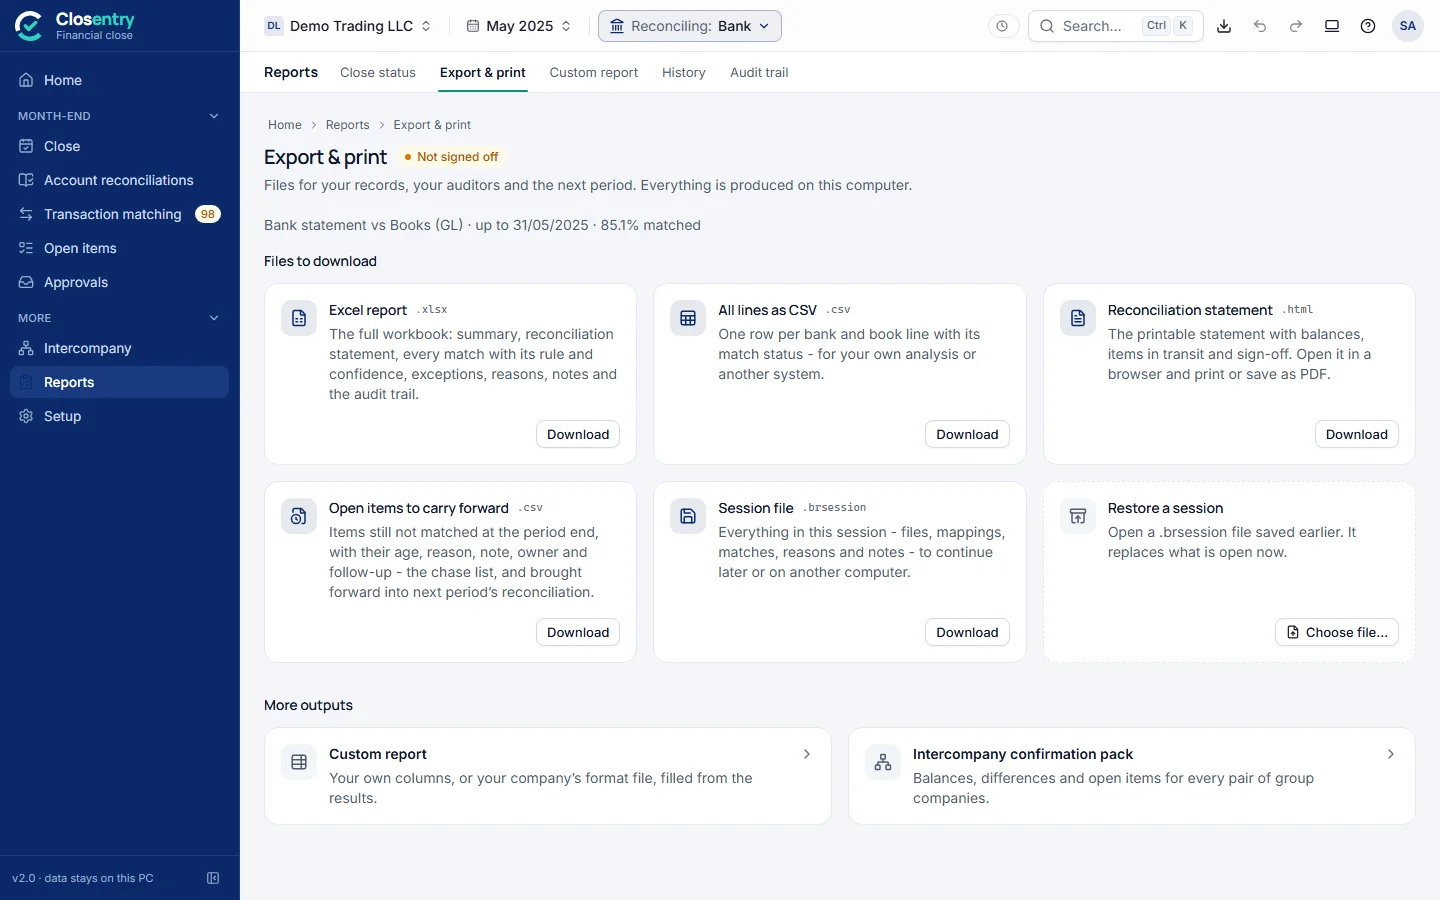
| Excel report (.xlsx) | The full workbook: summary, statement, every match with rule and confidence, exceptions, reasons, notes and the audit trail. Dates and amounts are real Excel values. |
| All lines as CSV | One row per line with its match status, for your own analysis or another system |
| Reconciliation statement (.html) | The printable statement. Open it in a browser to print or save as PDF. |
| Open items to carry forward | Load next period under Brought forward → From file |
| Session file (.brsession) | Everything in this session, to continue later or on another PC. Restore a session opens one. |
Every export is recorded in the audit trail. With Mask IBANs in exports on (Settings), account numbers appear as AE07 ****…3456.
12. Custom report in your own format
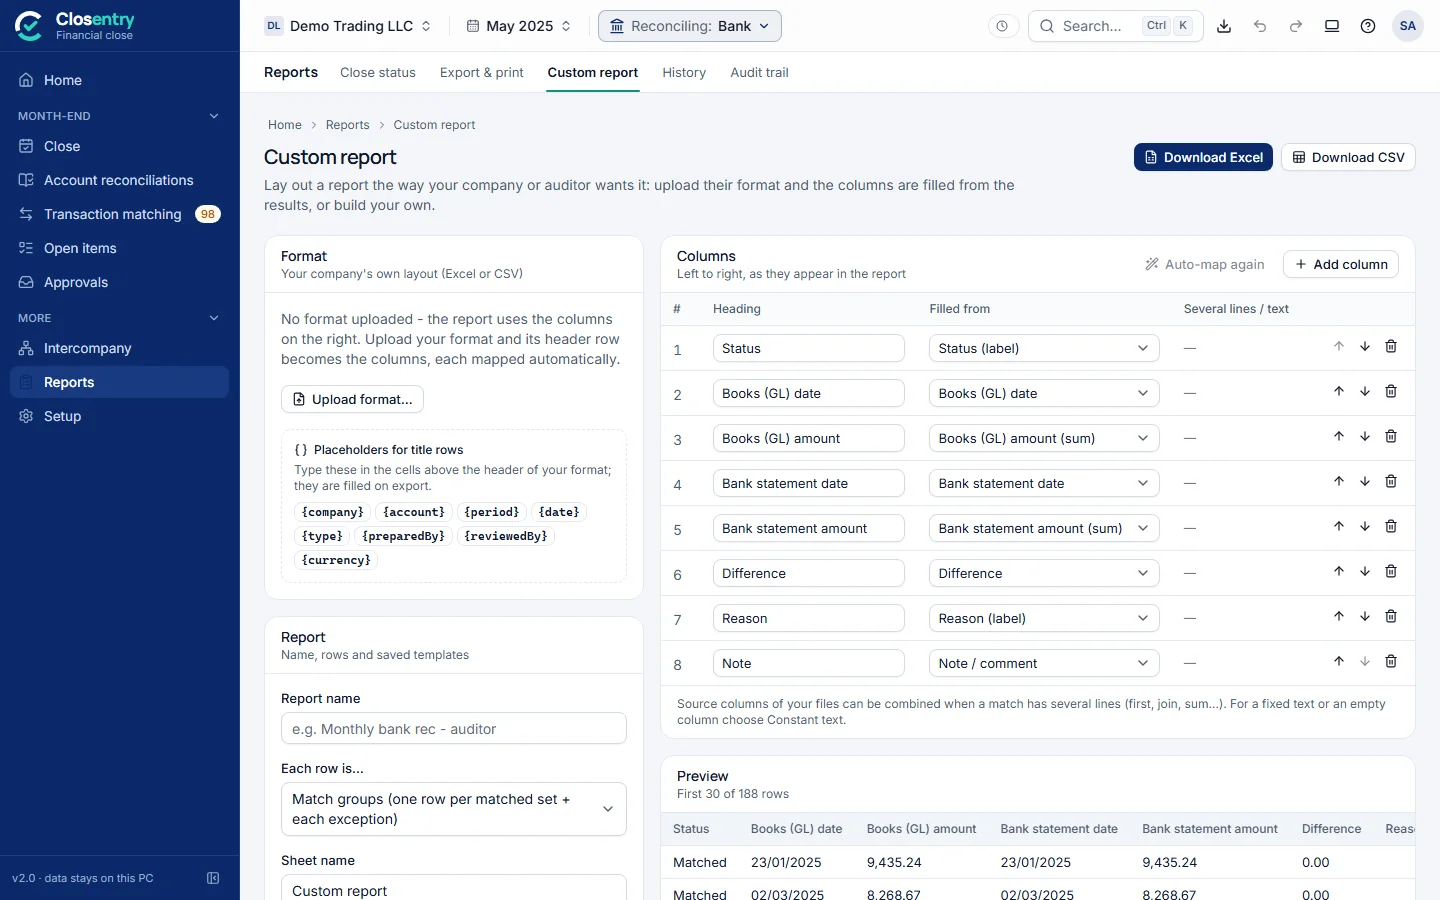
- Upload format…: choose your company's or the auditor's Excel/CSV layout. Its header row becomes the columns, and if it has several sheets you pick one.
- Each column is mapped automatically. For any column marked not mapped, choose a source in Filled from, or click Auto-map again. When a match has several lines, choose how to combine them (first, join, sum…).
- Choose what each row is: one row per match group, or one row per transaction.
- In title rows above the header, use placeholders:
{company}{period}{account}{date}{type}{preparedBy}{reviewedBy}{currency}. - Download Excel writes the report into a copy of your own workbook (logo, colours and widths kept) with real dates and numbers. Save template keeps the layout for next month.
13. Workpapers and approvals
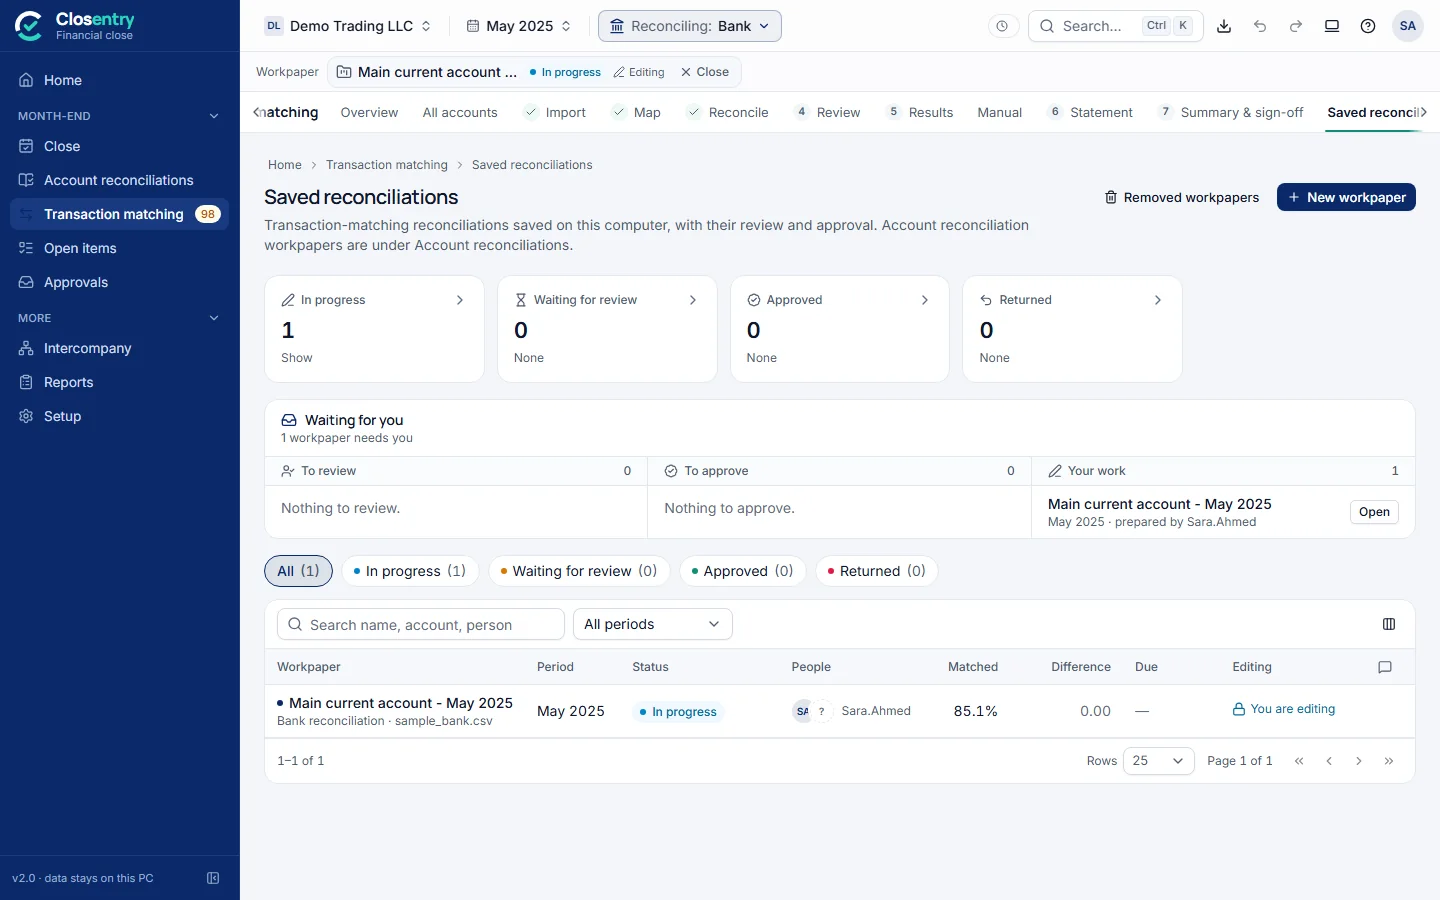
In a team (see the Setup guide), each reconciliation is saved as a workpaper in the shared folder. A workpaper has a preparer, a reviewer and, with two-level approval, an approver.
The flow
In progress → Waiting for review → (Waiting for approval) → Approved and locked. A reviewer or approver can Return to preparer with a comment.
- Preparer: click New workpaper, name it (for example "Main current account - May 2025"), choose the period, and start from the current session or empty. Reconcile as usual. Changes are saved to the team folder automatically.
- Submit for review on the Summary page. The sign-off checklist is checked. With open points you are asked to explain them (at least a short comment), and the explanation is recorded.
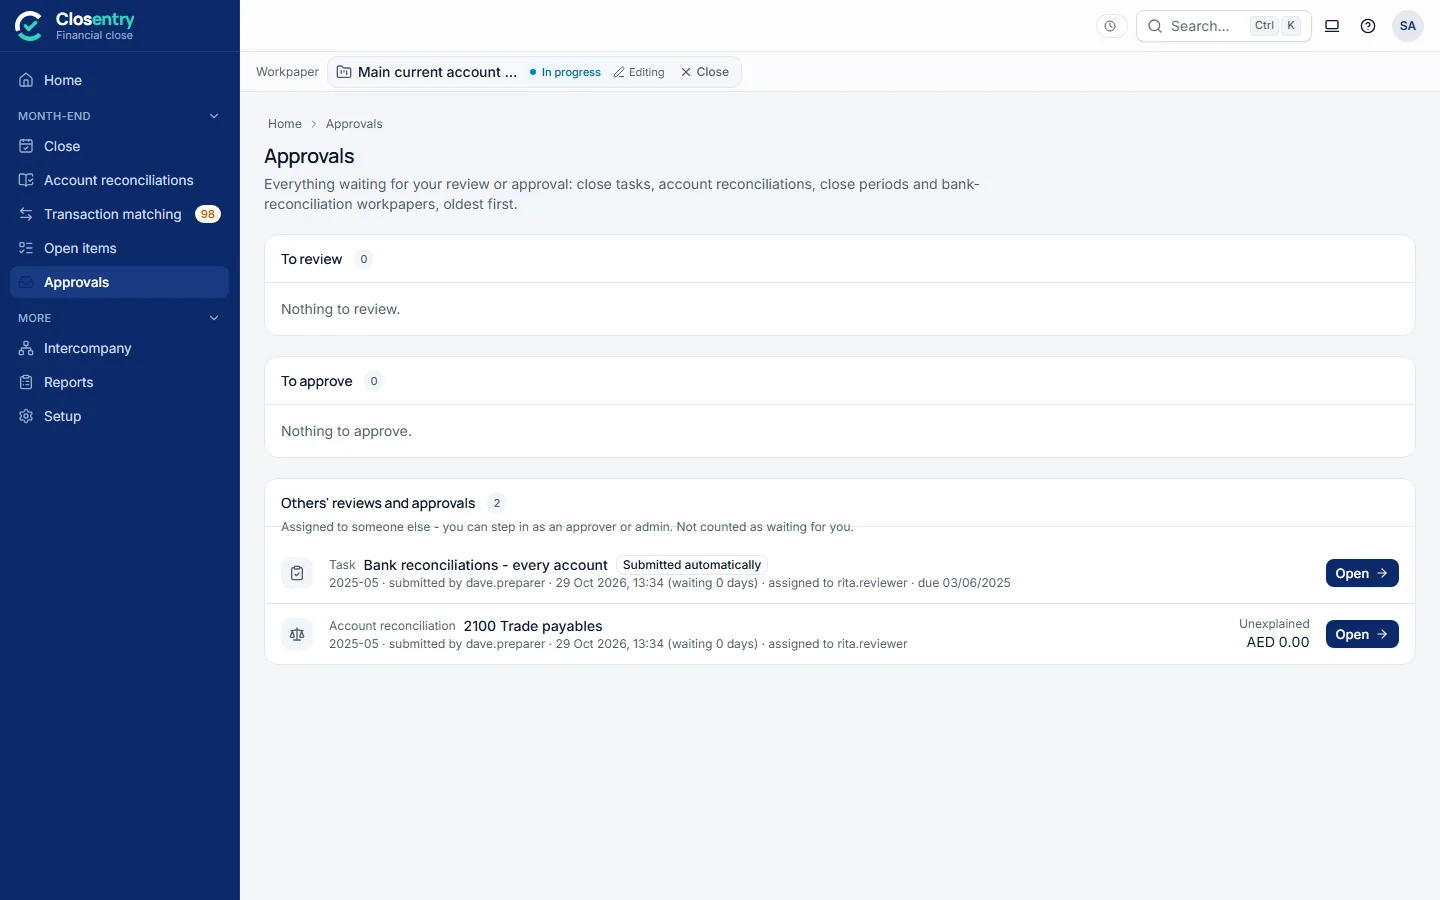
- Reviewer: the workpaper appears on Home under Waiting for you and in Approvals. Open it, check it, and click Approve… or Return to preparer.
- Approver (two-level approval): Approve and lock. The workpaper is signed off with the names of the preparer, reviewer and approver. Only an approver can Reopen it, with a reason.
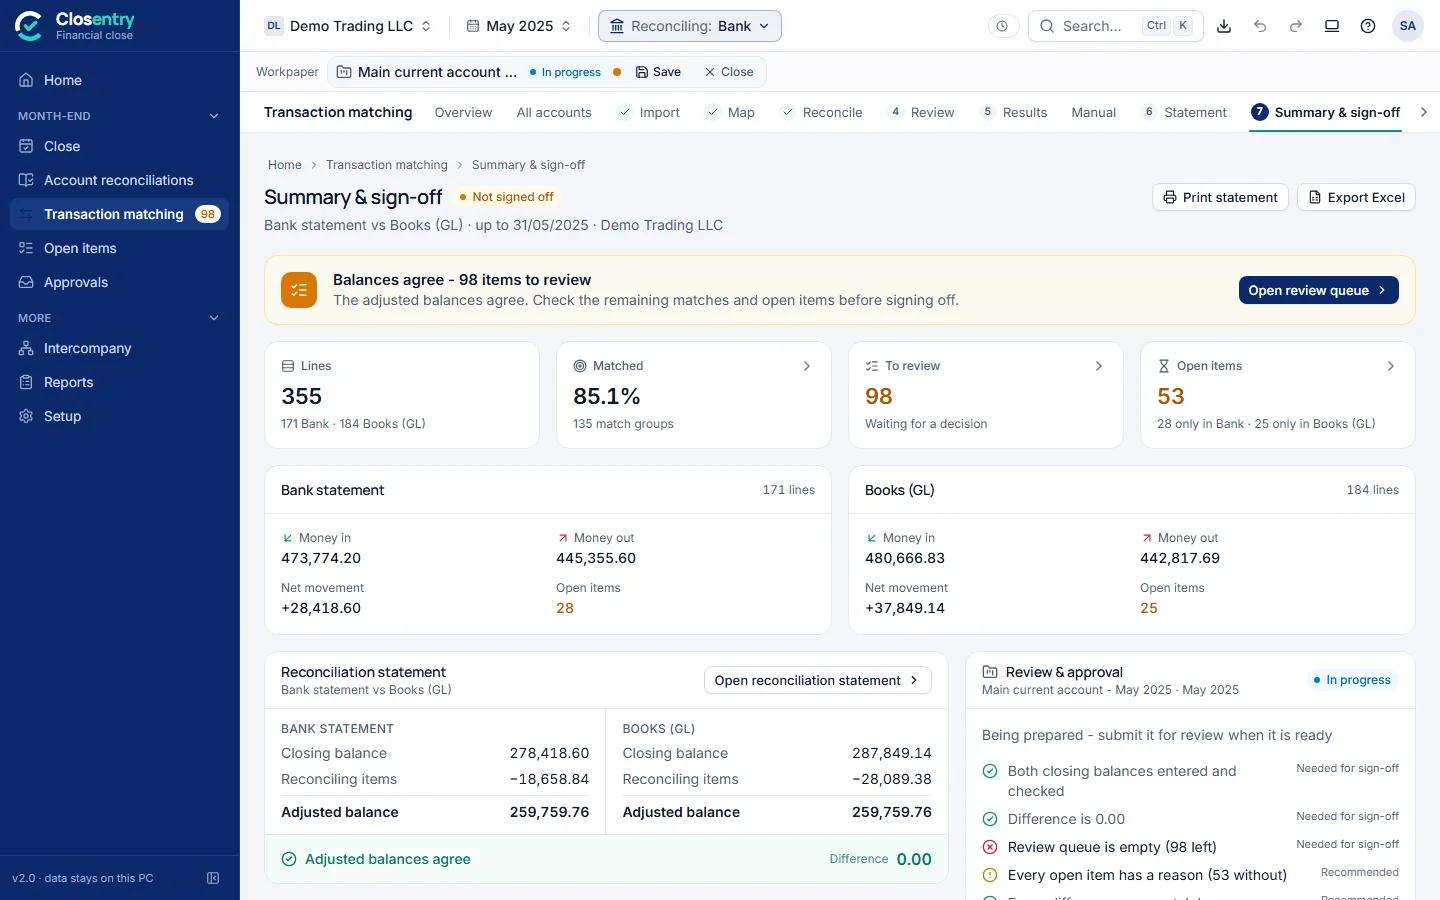
- One editor at a time. Others can open the workpaper read-only while you edit it. Close it from the workpaper bar when you are done.
- Separation of duties. You can't review or approve work you prepared, and the final approver must be different from the first reviewer.
- Comments on a workpaper keep the review conversation with the work. Removed workpapers can be restored.
14. Month-end close and account reconciliation
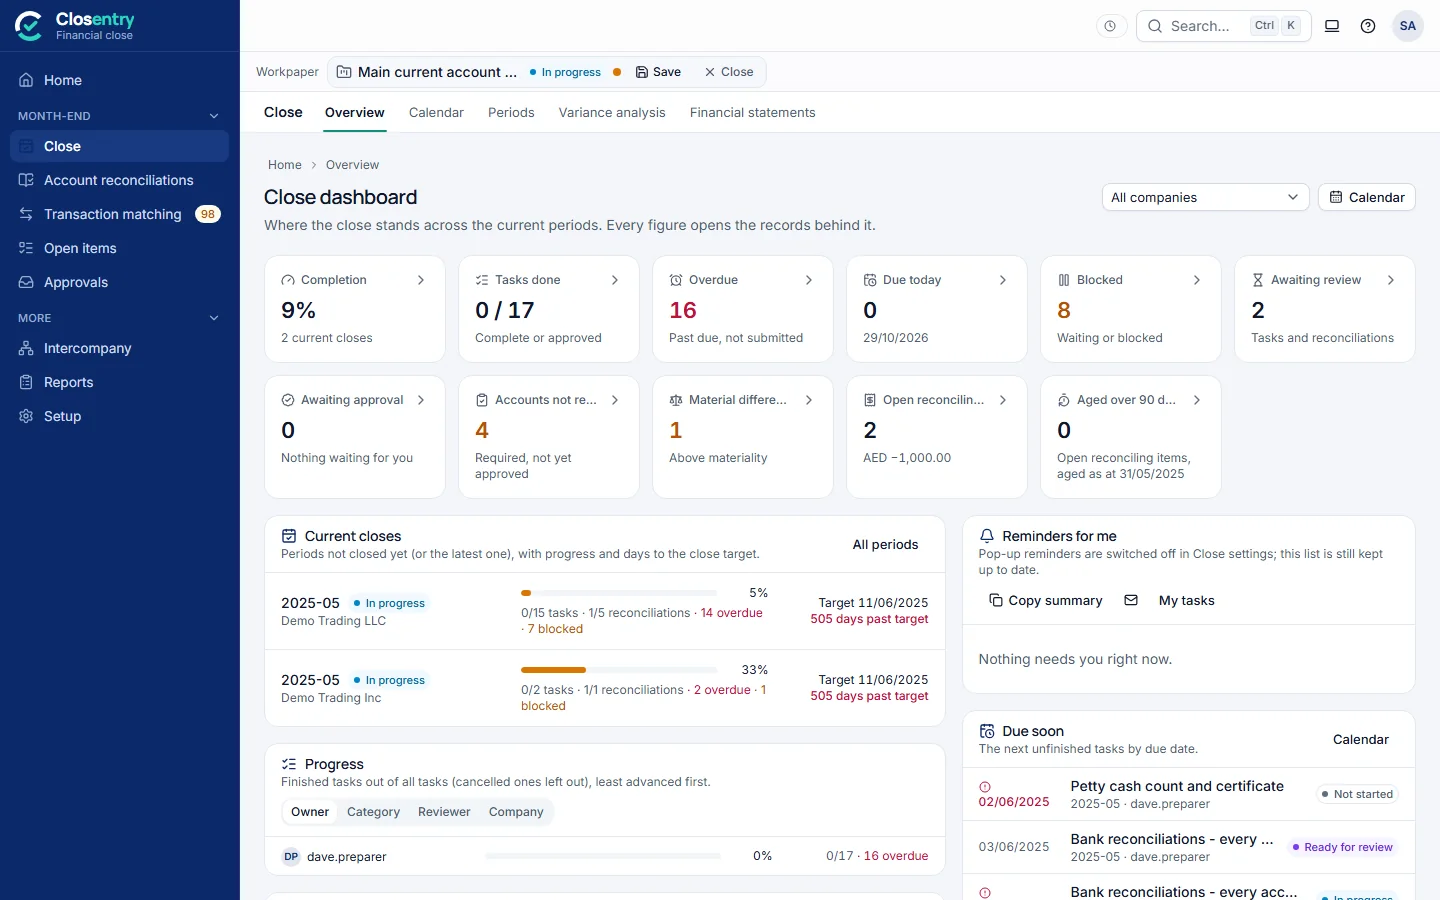
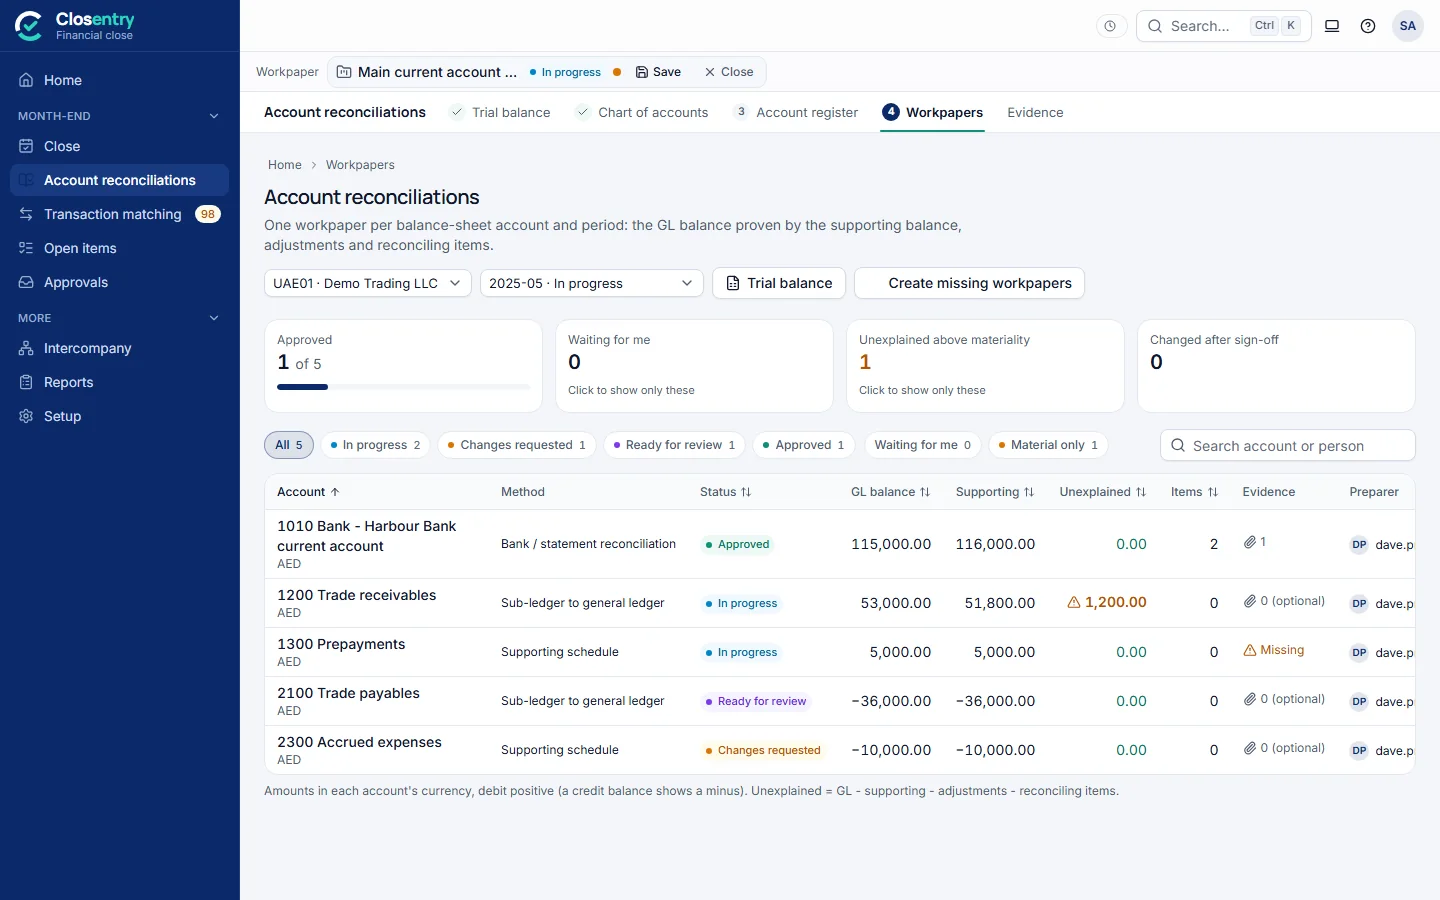
Four entries of the side menu run the month-, quarter- and year-end close: Close (Overview, Calendar, Periods), Account reconciliations (in the order of the work: 1 Trial balance, 2 Chart of accounts, 3 Account register, 4 Workpapers, then Evidence), Open items (reconciling items) and Approvals (everything waiting for your review or approval). Close › Overview shows what has to be done next; every figure opens the records behind it.
The first close
In a new workspace, Home shows three steps. Each opens the screen it needs; a finished step gets a tick.
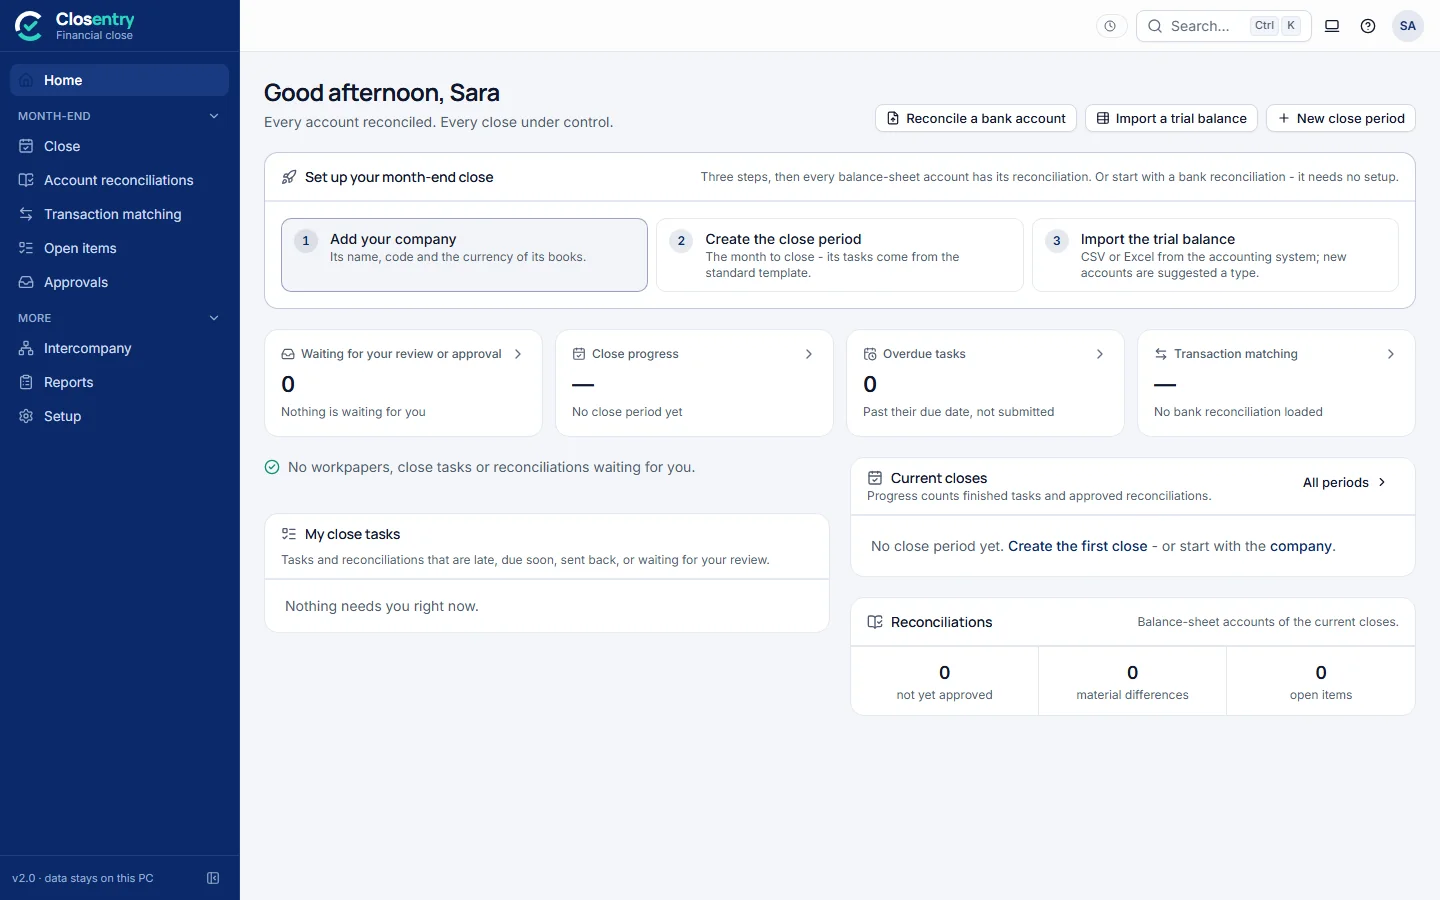
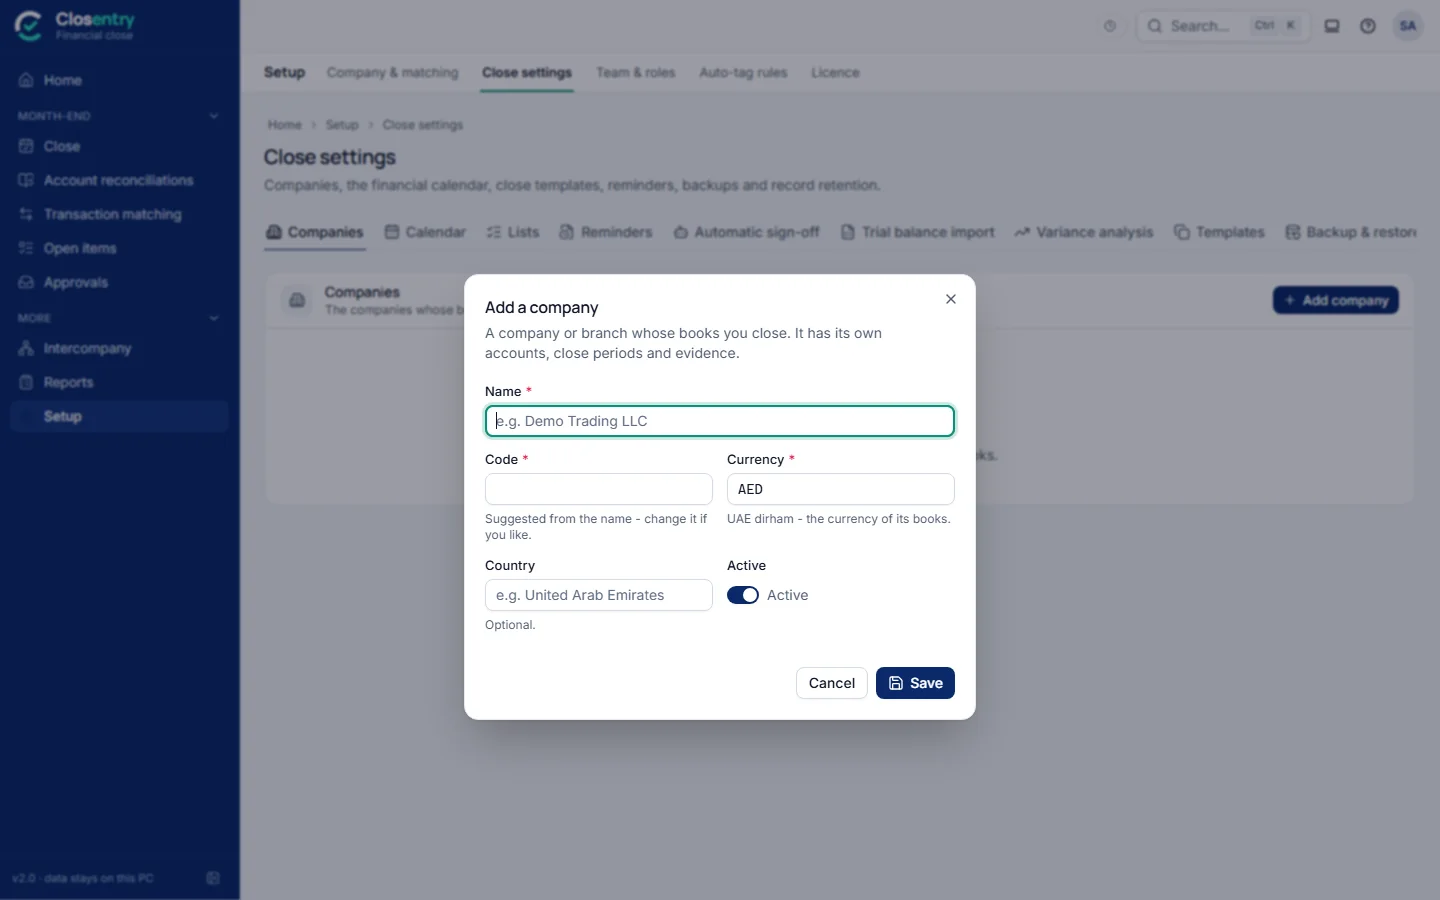
- Add your company: its name, a short code (for example UAE01) and the currency of its books, chosen from the list of real currency codes. A close always belongs to a company; with only one, it is chosen for you everywhere.
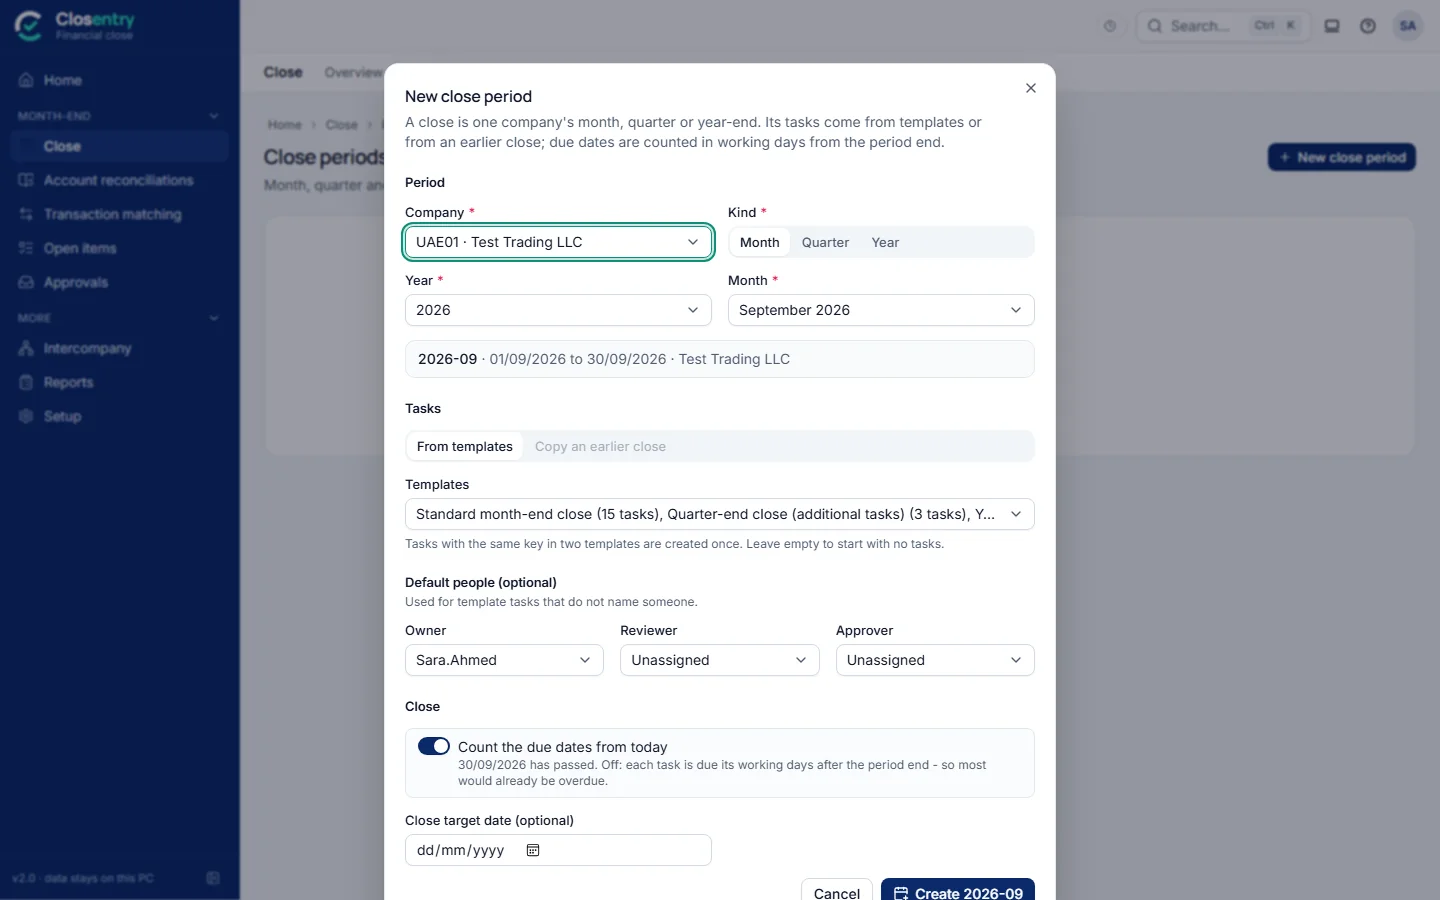
- Create the close period. The month that has just ended is suggested, with the standard month-end template (its quarter- and year-end tasks are added only at those period ends). The specialised templates overlap it, so tick them only if you want them. Working alone, the tasks are yours. Set up after the period has ended? Count the due dates from today keeps the tasks from being overdue on the first day.
- Import the trial balance (next page). Plain Debit and Credit columns are read as the closing balance, and next month the columns of the last import are used again.
Every month
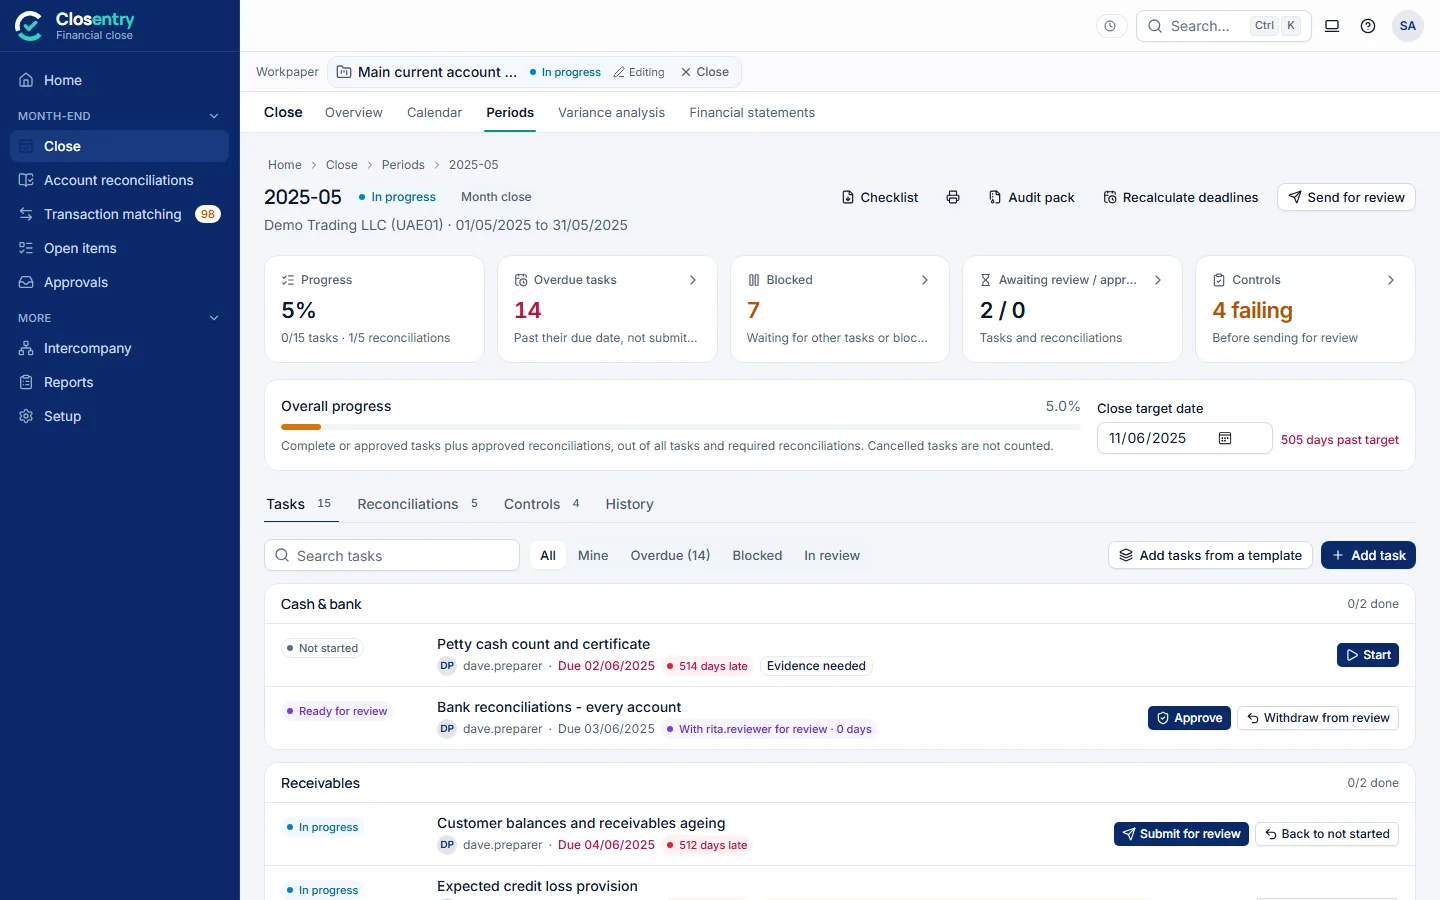
- Close › Periods → New close period: choose the entity, month, quarter or year, and the templates (or copy an earlier close). Tasks get owners, reviewers and due dates in working days after the period end.
- Owners Start their tasks and Submit for review; a task can't be finished before the tasks it waits for, or without its required evidence. Reviewers approve or request changes; nobody reviews their own work.
- Account reconciliations › Trial balance: import the period's trial balance (CSV or Excel). Every row is checked, a complete trial balance must balance, and one reconciliation workpaper is created per required account. Amounts with more decimals than the currency has are rounded.
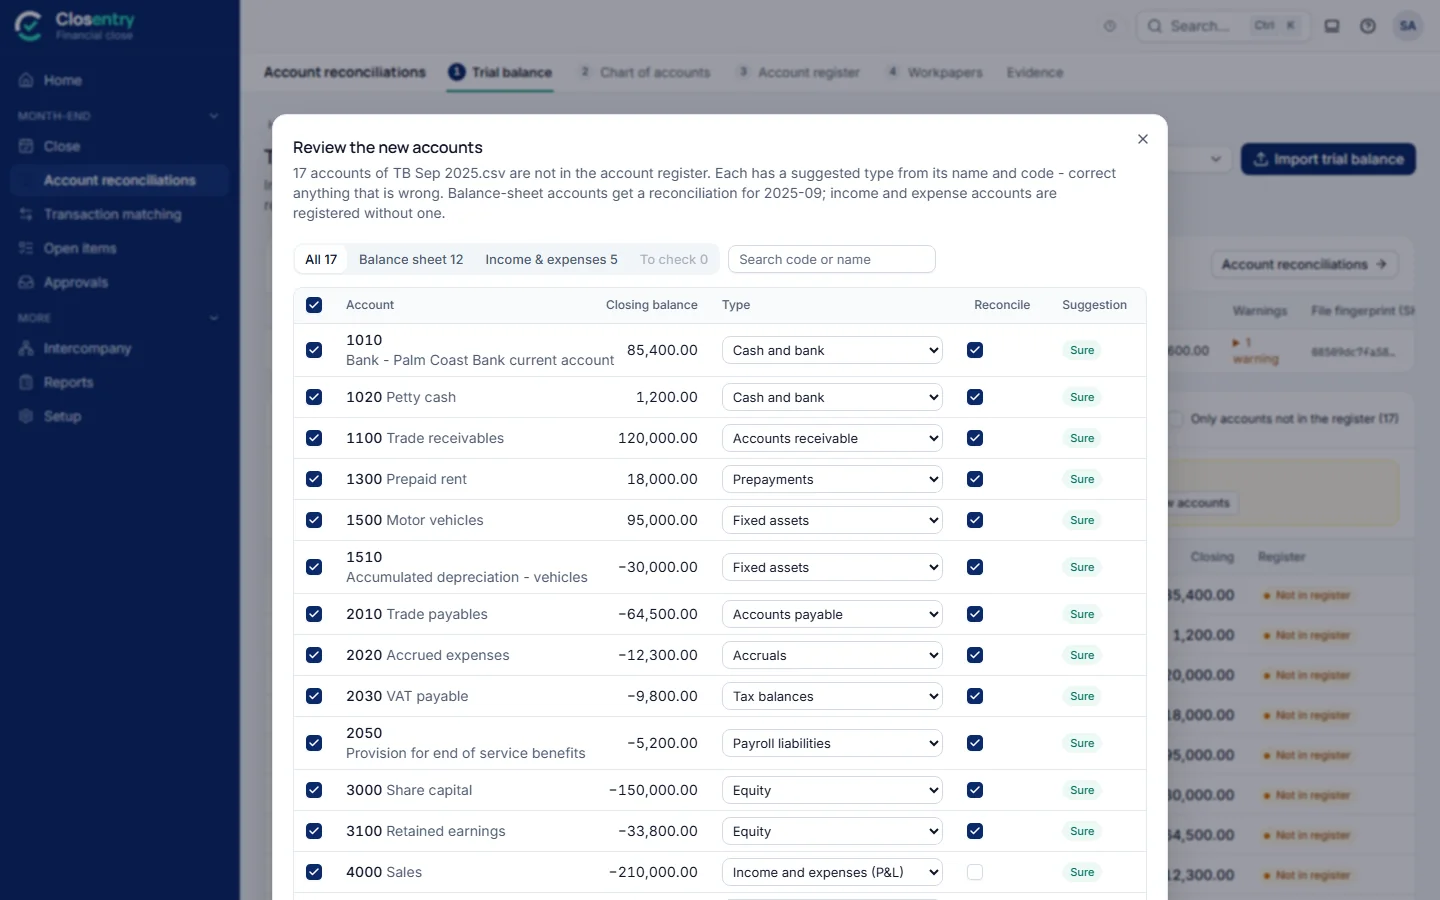
- New accounts are added by themselves: each gets a type suggested from its name and code (bank, receivables, accruals, fixed assets… or income and expenses, which need no reconciliation), and the balance-sheet accounts get their workpapers. Types the app is not sure of are marked To check in the account register: open the account, check the type and save. Undo the accounts added on the Trial balance page takes them back, with their reconciliations, as long as nobody has worked on them. More new accounts than the limit (500, in Close settings › Trial balance import), or automatic adding switched off there, and the new accounts are listed for review instead: correct what is wrong and click Add; the close tasks their types need (for example Fixed assets and depreciation) can be added in the same step.
- Accounts reconciled together. A “full level” trial balance lists every group total (Assets › Current assets › Advances to employees…) in bold above its accounts. The group rows are left out of the import, and each lowest group becomes one reconciliation of its accounts together – for example Advances to employees with every employee account in it, instead of one workpaper per employee. The group's GL balance is the sum of its accounts, and its reconciliation lists them. Any account of the register can be a group: in Account register, open it and list the account codes under Reconciled together.
- Account reconciliations › Workpapers: open an account and enter the support (statement, sub-ledger, schedule, roll-forward), add reconciling items and evidence, and submit. The workpaper shows GL − support − adjustments − reconciling items = unexplained difference; above the account's materiality it can't be submitted.
- When the controls pass, send the period for review and an approver closes it. The failing controls are named before you confirm; only an approver can override them, with a reason that is recorded. Reopening a closed period needs a reason too.
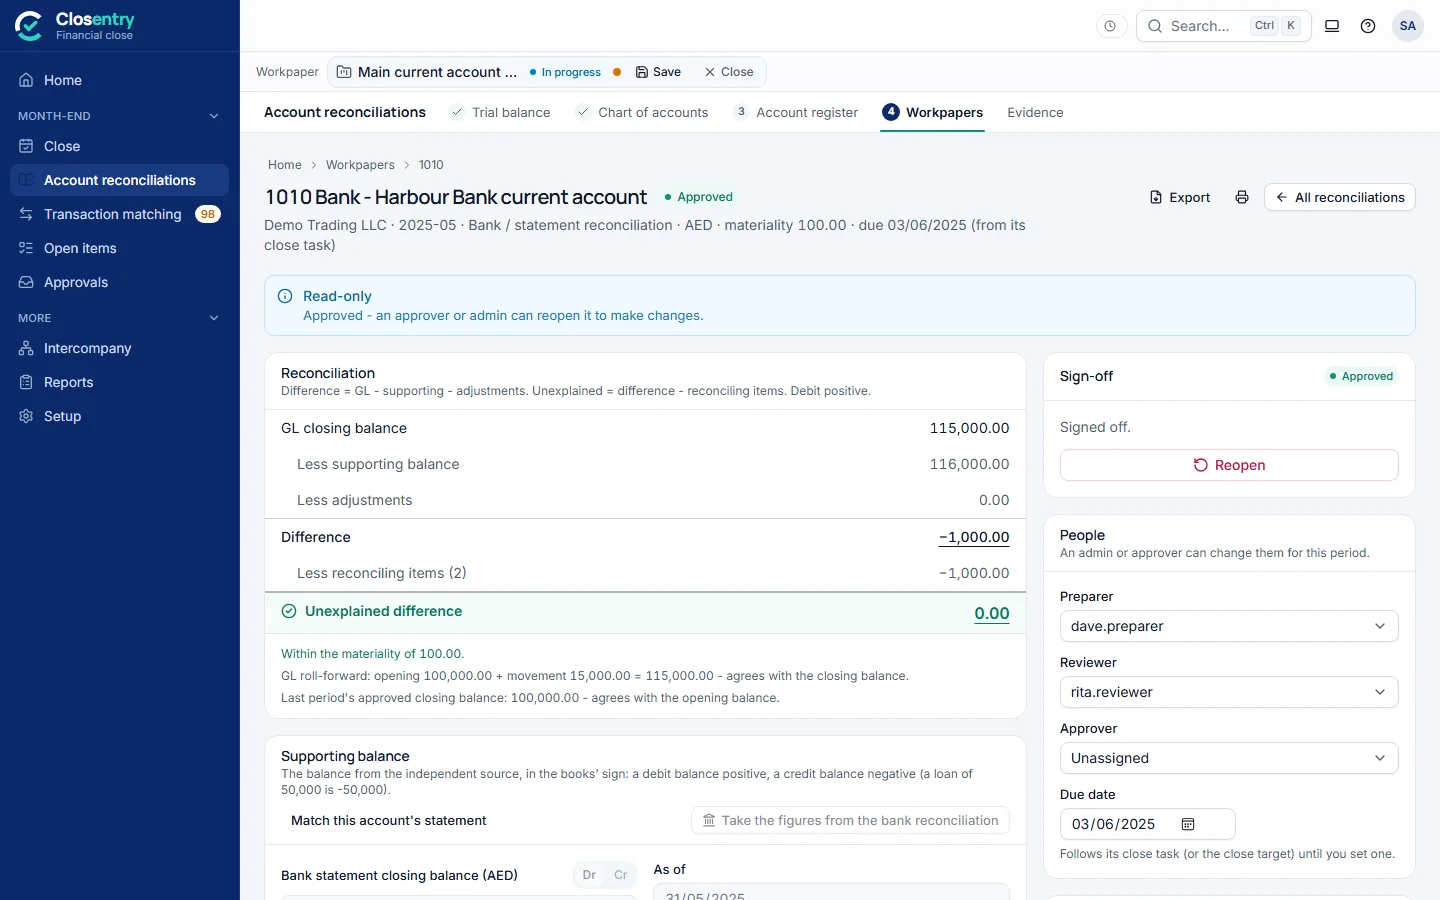
- While you edit, the calculation shows the figures with your unsaved changes; Save keeps them, Discard brings back the saved ones.
- The statement date is set to the period end when you enter the balance. A new reconciling item is offered the difference still unexplained and the period-end date.
Automatic sign-off of account reconciliations
Optional, and off until an admin switches it on in Setup › Close settings › Automatic sign-off. A reconciliation that meets a rule switched on there is approved by itself:
- Zero balance, no movement: no balance and no movement in the period - signed off without support.
- Fully reconciled: support entered and an unexplained difference of 0.00, for the account types chosen, with open reconciling items younger than the days set (none at all when the field is empty), a GL balance up to the amount set, and the evidence attached when the account requires it.
It shows as Signed off automatically, with the rule, on the reconciliation, in the lists, in the close status report and in the audit trail. When its figures change later, the sign-off is withdrawn like any other and the rules are checked again. A reconciliation that a reviewer sent back or a manager reopened is left to people until its preparer submits it again. The rules are checked whenever a reconciliation changes; Apply to this period checks a whole close period at once, for example right after switching them on.
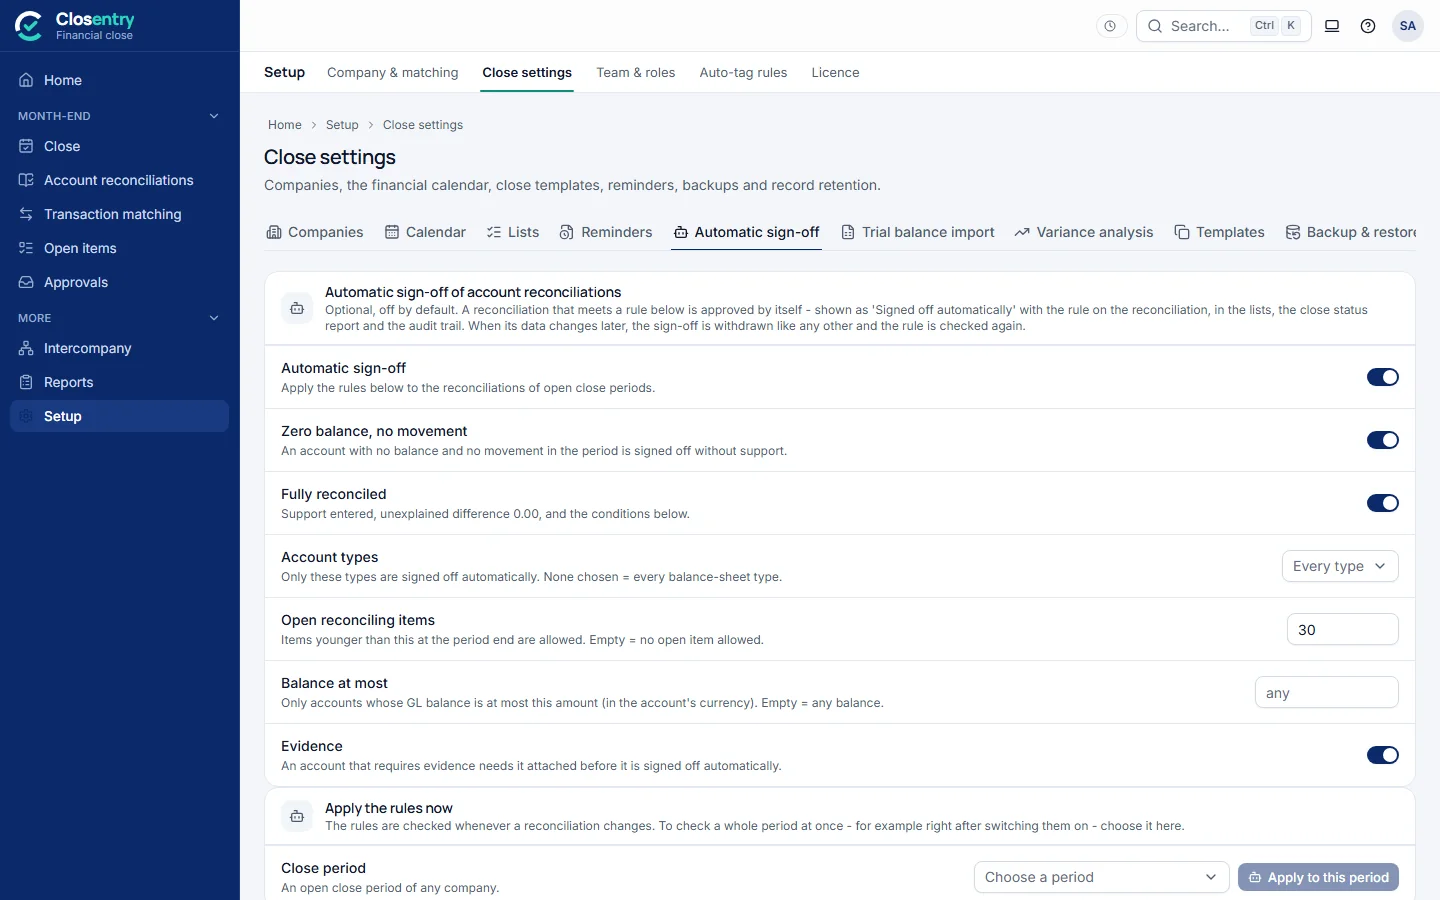
Chart of accounts
Account reconciliations › Chart of accounts shows the period's trial balance by category – cash and bank, receivables, prepayments, payables, accruals… income and expenses – with the number of GL accounts, the balance and how many are reconciled. Expand a category to its accounts and groups, and a group to its GL accounts; GL search finds any account and shows where it sits. The Reconcile tick box decides what gets a workpaper: untick an account or group to stop reconciling it, untick a GL account inside a group to take it out of the group, tick an account of the file that is not in the register yet to add it.
Variance analysis
Close › Variance analysis compares the period's actual figures, from its trial balance, with:
- the previous period or the same period last year (their trial balances);
- an earlier import of this period's trial balance – what changed since the first version;
- a budget or forecast version (below).
Balance-sheet accounts are compared on their closing balance, income and expenses on the movement of the period (for a quarter or a year, the sum of its months). The figures are debit positive like the trial balance. Each category opens to its accounts and groups, and a group to its GL accounts.
A variance is significant when it passes the thresholds in Close settings › Variance analysis (10% and 50,000 by default; both or either). Click the speech-bubble icon to explain it; someone else reviews the explanation and approves it or sends it back with a note (working alone, you may approve your own). If the figures change after an explanation was written, it is marked Figures changed and asked again. With the close check switched on in the same settings, a period can't be closed while significant variances are unexplained or unreviewed. Excel exports the analysis with the explanations.
Budgets and forecasts. Import budget or forecast reads an Excel or CSV file with one row per account and one column per month (Jan-2026, 2026-01 or 01/2026), or rows of Account, Month, Amount. Choose how the file shows signs – income and liabilities positive (the usual budget layout), debit positive, or credit positive – and check the preview before importing. Each import is a version with its own name (Budget FY2026, Forecast Oct 2026…): a new forecast does not replace the earlier ones, so actuals can be compared with any of them.
Financial statements
Close › Financial statements prepares, from the period's trial balance:
- the balance sheet (statement of financial position), with the profit for the year to date in equity;
- the income statement – the movement of the period, or Year to date;
- the cash flow statement (indirect method): the profit, depreciation added back, the changes in working capital, then investing and financing – it must end on the cash of the balance sheet;
- the statement of changes in equity: share capital, reserves and retained earnings from the opening to the closing balance.
A comparative column shows the previous period or the same period last year. Opening balances come from the file; when the file has none, from the previous period's trial balance (at the start of the financial year, last year's result is carried into retained earnings). A difference row appears when a trial balance does not balance.
Statement lines. Every GL account sits on one line (Trade receivables, Revenue, Finance costs…), chosen from its category in the account register, its name and its group, and from how the chart is numbered (for example codes 2… are liabilities). Click a line to see its accounts and groups, and pick another line to move one; a group moves with all its accounts, and inside it one account can be moved on its own. Statement lines lists them all, with the reason for each and a Changed only filter. The lines are kept per company and used for every period.
Excel (linked to the trial balance) exports the four statements together with the trial balance and the list of statement lines. Every figure of the statements is a formula on the Trial balance sheet (a SUMIFS on the statement-line code in column E): change a balance or a code there – the column has a drop-down of the codes – and Excel recalculates the statements. Lines with no account are hidden rows, so an account moved there still adds up; check rows show 0 while the statements tie.
15. Intercompany group
Intercompany (side menu → More) reconciles every pair of group companies in one run.
- Add company ledger… once per company: its intercompany accounts or its whole GL. Give each company its name and any aliases (codes, short names, account numbers).
- Tell the app which column names the partner company, or let it read the narration. Lines whose partner can't be found are counted, not guessed.
- Reconcile all pairs, optionally as of a date. The matrix shows ✔ for pairs that agree, or the difference. Open loads a pair into Transaction matching line by line.
- What you do in Transaction matching comes back here. The pair's matches, its open items with their reasons and the sign-off show in the pair's Transaction matching column and under its open items. Opening the pair again puts your earlier decisions back. An Intercompany reconciliation started in Transaction matching is linked on Reconcile (Intercompany group pair): choose the two group companies – suggested from the file names – or add a side's file to the group as a new company. If a company's ledger changes afterwards, the pair shows Ledgers changed: open it again.
- Record a dispute per pair (Open / In discussion / Resolved, owner, notes).
- See the netting proposal (fewest payments that settle the group) and the elimination entries for consolidation.
- Export confirmation pack: one workbook with a balance confirmation per pair, ready to sign.
16. History, auto-tag rules and audit trail
- History keeps a snapshot of each period: match rate, open items and difference over time. It is also the source for Brought forward → From last period.
- Auto-tag rules give recurring lines a reason and note automatically, for example "bank charges" for CHG lines.
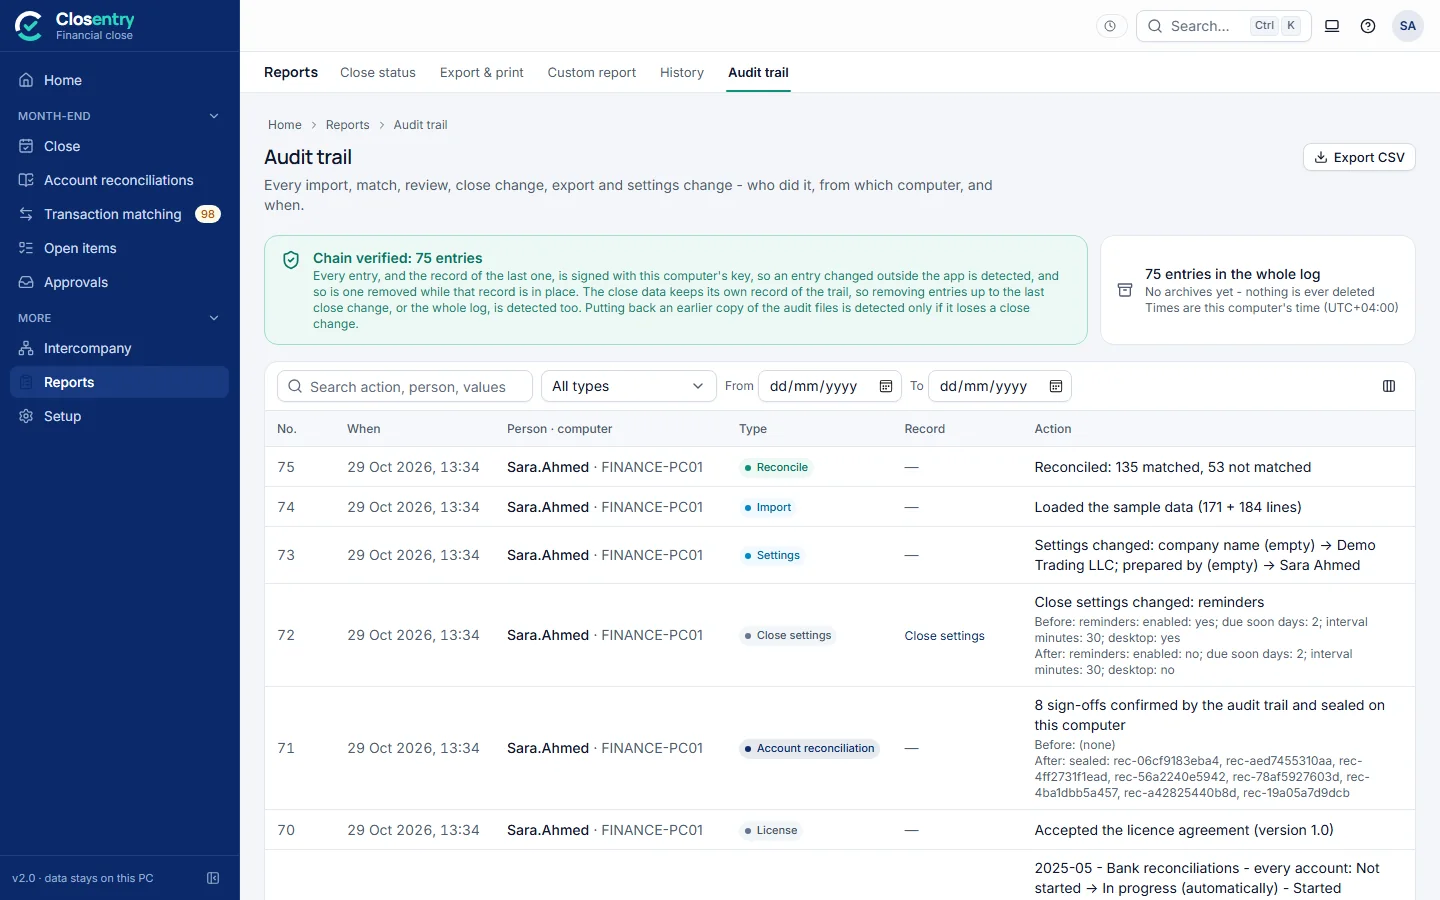
- Audit trail lists every action with the Windows user and computer, chained with SHA-256. It shows Chain verified, or the first entry that was changed. Settings changes, FX rates and exports are all recorded.
17. Settings
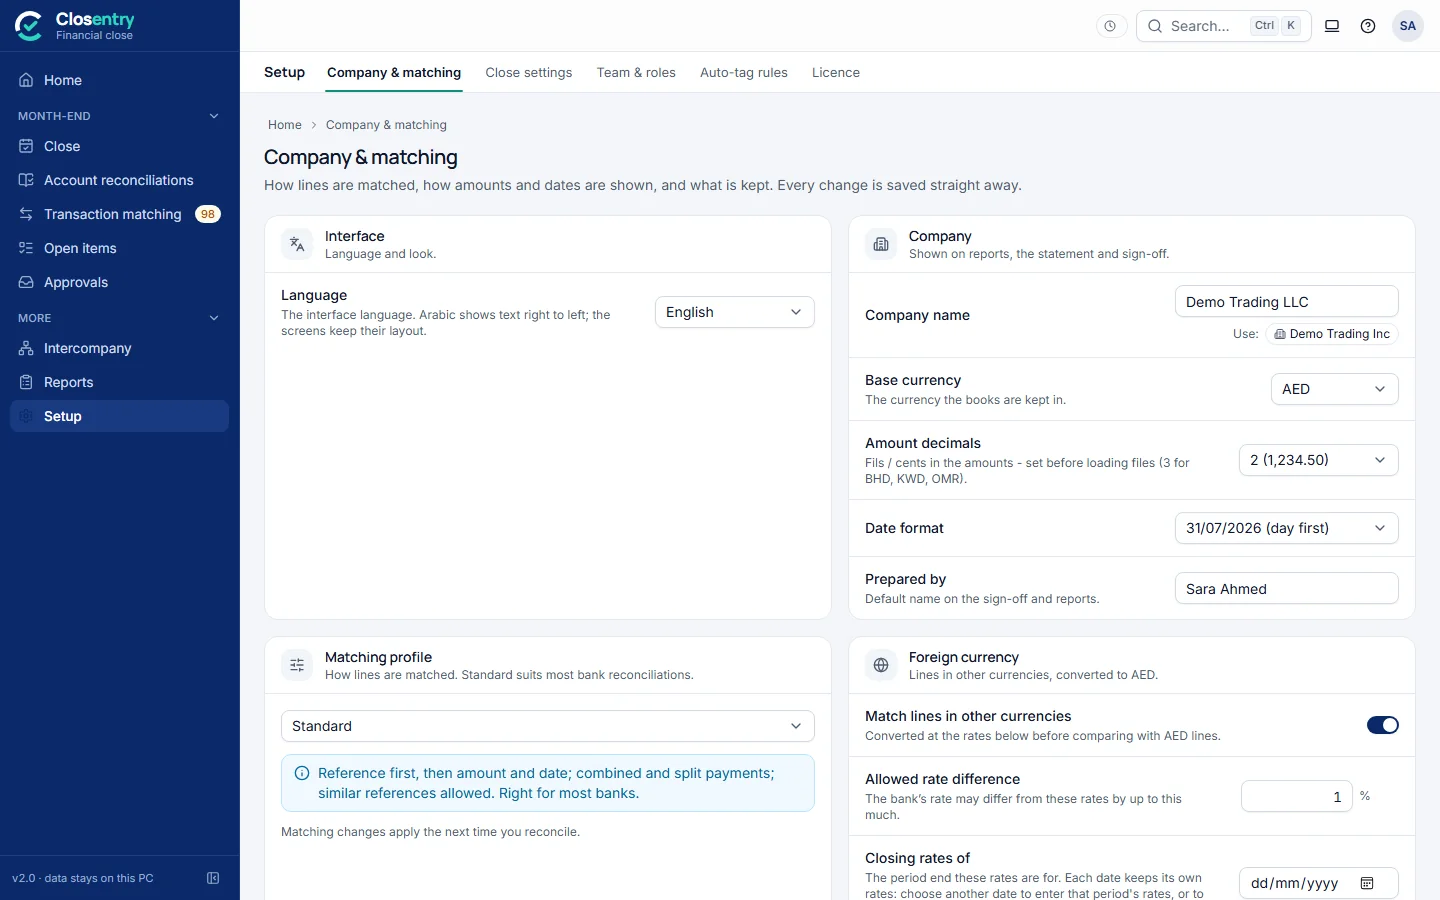
- Company: company name, base currency, amount decimals (3 for BHD, KWD, OMR; set it before loading files), date format, and prepared by.
- Matching profile: the starting point for all matching settings (Standard suits most banks).
- Foreign currency: whether lines in other currencies are matched, and the closing rates of the period.
- Advanced matching settings (closed unless the profile is Custom): Dates, Amounts, Matching steps and Similar references - the date window, whether to skip weekends (Saturday + Sunday or Friday + Saturday), amount and percentage tolerances, the bank-fee allowance, and which passes run. Most people never need them. Changes are applied at the next run.
- Privacy & compliance: encryption with your Windows login, IBAN masking, and the cash-reporting threshold (AED 55,000).
- Theme: light or dark. The theme can be changed even when a reconciliation is locked.
Changing the date format or base currency after a run marks the results out of date. A banner asks you to run again, and your decisions are kept. Amount decimals can't be changed once there are results: clear and reload the files first.
18. Keyboard shortcuts
Press ? anywhere for this list.
| Keys | Action |
|---|---|
| Ctrl+K | Search accounts, periods, tasks, items and transactions, jump to a screen or run an action |
| Ctrl+Z / Ctrl+Y | Undo / redo (bank matching) |
| Alt+1 … Alt+9 | Home, Close, Account reconciliations, Transaction matching, Open items, Approvals, Intercompany, Reports, Setup |
| Esc | Close a dialog, menu or side panel |
| A R N P 1-8 | Review queue: accept, reject, next, previous, reason |
19. What each match type means
| Label | Meaning | Confidence |
|---|---|---|
| Exact reference | Same reference and amount on both sides | 100 |
| Same reference, dates far apart | As above, but the dates are outside the normal window | 95 |
| Similar reference | References nearly match (typos, separators, the reference inside the narration). Different numbers never count as similar. | about 75 |
| Same amount and date | Same amount and direction within the date window, no reference evidence. Marked ambiguous when several identical amounts were equally close. | 80 (60) |
| Amount tolerance | Amounts differ by no more than your tolerance. The difference appears on the statement. | below 80 |
| Combined (many → one) | Several lines on one side add up to one line on the other, for example a batch deposit | 70-90 |
| Split (one → many) | One line paid or received in several parts | 70-90 |
| Reference found in narration | Our reference appears exactly in one line's text on the other side | 95 |
| Combined / split by reference | Several lines share one reference and together equal the other side | 95 |
| Equal parts / equal-amount pool | Repeated identical amounts against whole multiples. Always reviewed. | 70 |
| Foreign currency | A line in another currency compared in the base currency at your rates. The exchange difference goes to the statement. Always reviewed. | 72-88 |